waitForComputedDateTime Step
Description:
The WaitForComputedDateTime workflow step pauses the workflow instance until the date and time specified in the Computed date and time property is reached.
Unlike the Wait step, which waits for a specified duration, and WaitForDateTime, which directly specifies a target date and time, WaitForComputedDateTime is designed to use a date and time that has been computed or mapped for the workflow.
The step supports:
- Waiting until a computed date and time
- Mapping a computed date/time value into the step
- Dynamic date/time-based workflow progression
- True and False return paths
This step can be used for:
- Customer-specific deadlines
- Dynamically calculated due dates
- Contract and subscription dates
- Calculated reminder dates
- SLA-based workflow processing
- Business-calendar calculations
- Workflow scheduling based on previously calculated values
- Dynamic time-based business automation
Inputs
- computedDateTime – Required computed date and time value that specifies when the workflow should continue.
Returns
- True – True return path from the WaitForComputedDateTime step.
- False – False return path from the WaitForComputedDateTime step.
Usage:
The WaitForComputedDateTime step is typically placed at a point in a workflow where the target date and time is determined dynamically rather than entered as a fixed date/time.
A preceding workflow activity can calculate or determine the required date and time, after which that value can be mapped to the Computed date and time property.
For example, a workflow can:
- Calculate a customer-specific response deadline and wait until that deadline.
- Calculate an invoice follow-up date and pause until that date.
- Determine a renewal date based on contract information.
- Calculate an SLA deadline and wait until the calculated time.
- Determine a reminder date from workflow data.
- Calculate a processing date based on business rules.
When the configured computed date and time is reached, the workflow continues through the configured return path.

When the workflow reaches the WaitForComputedDateTime step, it uses the supplied computed date and time as the wait target. The workflow proceeds when that target is reached.
Typical Workflow Suggestions:
Customer-Specific Deadlines
Use WaitForComputedDateTime when each workflow instance has its own calculated deadline.
Example:
Receive Request → Calculate Response Deadline → Wait Computed → Process Escalation
This allows the same workflow definition to be scheduled for a different date/time for each process instance.
SLA Processing
Use the step when an SLA deadline is calculated from information associated with a request.
Example:
Create Ticket → Calculate SLA Deadline → Wait Computed → Escalate Ticket
The calculated SLA deadline can determine when escalation processing should begin.
Invoice Follow-Up
Use WaitForComputedDateTime when a follow-up date depends on invoice information.
Example:
Create Invoice → Calculate Follow-up Date → Wait Computed → Send Reminder
This allows the follow-up timing to vary based on the invoice or business rules.
Contract Renewal
Use the step when a renewal date is derived from contract information.
Example:
Load Contract → Calculate Renewal Date → Wait Computed → Start Renewal Process
This is useful when different contracts have different renewal dates.
Dynamic Reminders
Use WaitForComputedDateTime to schedule reminders based on workflow data.
Example:
Create Request → Calculate Reminder Date → Wait Computed → Send Reminder
The reminder date can be determined dynamically for each workflow instance.
Business Rule-Based Scheduling
Use the step when business rules determine the target date and time.
Example:
Receive Order → Calculate Processing Date → Wait Computed → Process Order
This can be useful when processing dates depend on information such as order details or other workflow data.
Dynamic External-System Coordination
Use this step when an external system or preceding process determines when the next workflow activity should occur.
Example:
Receive External Data → Determine Processing Time → Wait Computed → Continue Processing
Example:
Let’s build and execute the “waitForComputedDateTimeDef” example.
- Create a new process definition called “waitForComputedDateTime” and open the definition in designer mode.
- Drag a “placeholder, waitForComputedDateTime” step to the canvas.
- Connect the dots between the “Start” and other steps, as shown above.
- Select the line between the steps to configure the “Connection Properties”. The default property values are “None, True, False, Error, and Evaluate”. Depending on the step’s purpose, additional values are available for configuration.
- Click the “waitForComputedDateTime” step to configure its “Required” properties. Provide a name for the step. Click the button to set the date and time. Click the Save button. Note: Click the "AI Predict" button to have Copilot add new process steps that match your process description.

- A pop-up window appears for configuration. Select the compute frequency from the drop-down list. Select the time zone from the list. Enter the compute time. Click the Save button.

- The “Logging” configuration is necessary for documentation and also measures workflow progress and percent complete. This is achieved by configuring the step state and percent fields individually, as shown in the images below. Configure the “Logging” using the following properties.

- Save the process definition, create a new instance, and then execute it. Render the process instance to see that it is “sleeping”.
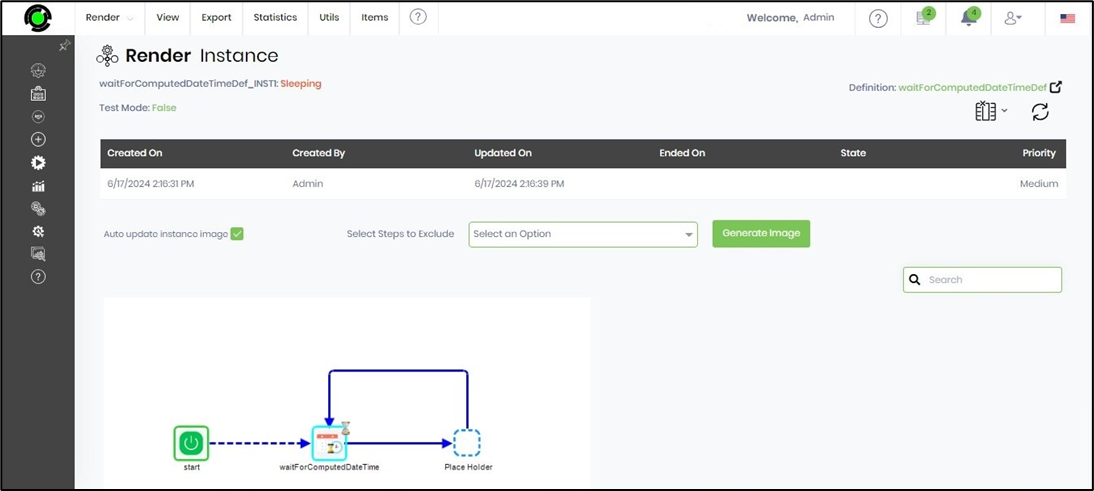
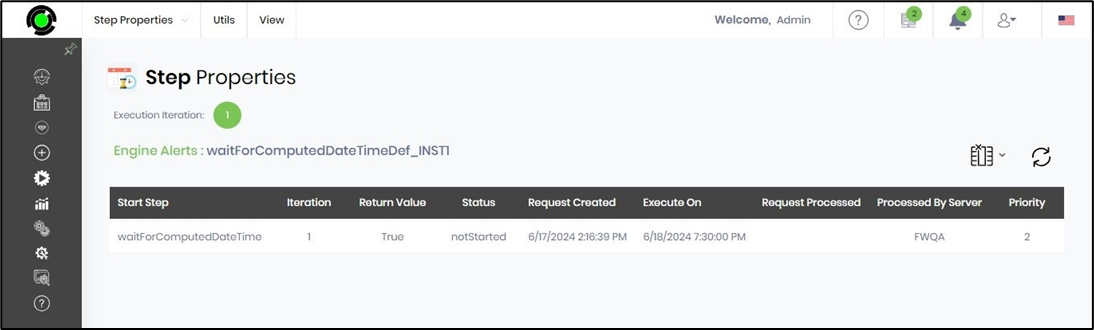
- Click the process step to view its properties. The step shall enter wait (sleep) mode until the date and time are configured in the computed datetime field. On the Step Properties page, navigate to the View—Engine Alerts menu option to view the computed datetime execution, as shown below.
Tips:
- Use WaitForComputedDateTime when the target date and time is calculated or mapped dynamically.
- Use WaitForDateTime when the workflow needs to wait for a specified date and time.
- Use Wait when the requirement is based on a relative duration such as "wait 3 days."
- Make sure the computed date/time value is available before the workflow reaches the WaitForComputedDateTime step.
- Use meaningful step names such as “Wait for SLA Deadline”, “Wait for Renewal Date”, or “Wait for Calculated Reminder” to make workflow execution easier to understand.
- Test the date/time calculation separately, when possible, to ensure that the computed target reflects the intended business deadline.
- Consider time-zone handling when the computed value is generated from data originating in different geographic locations.
Notes:
The WaitForComputedDateTime step is defined in the Engine category with the internal name waitforcomputeddatetime and display name Wait Computed.
The workflow step is implemented by the FlowWright.Workflow.WaitForComputedDateTimeStep namespace in FlowWright.Workflow.dll and is defined as a Process step. It supports 2 incoming connections and 2 outgoing connections.
The “Computed date and time” property is the only configured input and is required. It uses the WaitComputedDateTime data type.
The WaitComputedDateTime property type is described in the XML as “Map computed date and time,” indicating that the step is intended to receive a computed or mapped date/time value.
The XML definition does not expose separate duration, wait-unit, start-date, time-zone, or weekend properties for this step. The target is represented by the required Computed date and time input.
Feature comparison:
| Feature | Wait | WaitForDateTime | WaitForComputedDateTime | WaitForMessage |
|---|---|---|---|---|
| Primary purpose | Pause for a specified duration | Pause until a specific date/time | Pause until a computed date/time | Pause until a message is received |
| Display name | Wait | Wait to Date | Wait Computed | Wait For Msg |
| How wait period is determined | Duration + unit | Explicit date/time | Computed date/time value | Incoming message |
| Start date supported | Yes, optional | Not separately; the target is Wait till
|
Encapsulated in computed date/time | No |
| Time zone supported | Yes | Yes | Not exposed as a separate property | No |
| Duration units | Yes | No | No | No |
| Minutes / hours / days / months / years | Yes | No | No | No |
| Weekend handling | Yes, for day-based waits | No | Not exposed | No |
| Dynamic/computed target time | Indirectly through inputs, but duration-based | Date/time property | Yes — specifically designed for this | Not applicable |
| Message/event driven | No | No | No | Yes |
| Required input | Wait duration and wait type | Wait-till date/time | Computed date/time | Message to wait for |
| Outputs | True / False | True / False | True / False | True / False |
| Typical use | "Wait 3 days" | "Wait until Jan 15 at 10 AM" | "Wait until the date/time calculated by the workflow" | "Wait until a specified message arrives" |
Definition Sample:
You may download a sample definition when provided and import it into your FlowWright Process Definition.
Note: Verify and complete any missing configuration after importing a sample, including:
- Computed date and time value
- Date/time calculation or mapping
- Outgoing workflow connections
- Environment-specific settings
After verifying the configuration, save the Process Definition before execution.
Click here to download the sample file.