Description:
The Route Form to Queue workflow step routes a form task to a selected queue. The step allows the workflow to specify the queue, task description, form definition, and form instance, along with optional task and queue priorities, field visibility settings, and task expiration settings.
The step supports:
- Selecting a queue to route the form task to.
- Providing a task description and optional task detail description.
- Selecting the form definition associated with the task.
- Specifying a form instance ID using a Variable, Global, or FormVariable.
- Setting form fields to hidden or read-only.
- Setting subforms to hidden or read-only.
- Configuring task and queue priority.
- Configuring the task expiration type.
- Specifying how long the task can take to complete.
- Specifying whether weekends are included when determining task completion.
- Returning
completedorrejectedresults for subsequent workflow processing.
Inputs
- selectQueue – The Select queue to route to property specifies the queue the form task is routed to.
- taskDesc – The Task description property specifies the task description.
- taskBody – The Task detail description property provides additional details about the task.
- formDefinition – The Select form definition property specifies the form definition associated with the routed task.
- formInstanceID – The Variable/Global/FormVariable holds the form instance ID property and specifies the form instance ID associated with the task.
- Set form fields hidden or readOnly - The Set form fields hidden or readOnly property controls the hidden/read-only configuration for form fields.
- Set subforms hidden or readOnly – The Set subforms hidden or readOnly property controls the hidden/read-only configuration for subforms.
- taskPriority – The Task Priority property specifies the task's priority.
- queuePriority – The Queue Priority property specifies the queue's priority.
- expireType - The Task expire type property specifies the task expiration type.
- daysToComplete – The Complete the task in property specifies the configured task completion period.
- includeWeekends - The Include weekends property determines whether weekends are included in the task completion configuration
Returns
- Completed – The completed return path can be connected to the next workflow activity for the workflow path represented by a completed result.
- Rejected – The rejected return path can be connected to an alternative workflow path for the workflow logic represented by a rejected result.
Usage:
The Route Form to Queue step is typically placed at a point in a workflow where a form task needs to be routed to a queue for further work.
The workflow provides the target queue, task information, form definition, and form instance. Optional properties can be used to control form field visibility, task priorities, and expiration settings.
A typical workflow pattern is:
Prepare Form → Route Form to Queue → Process Task
The routed task can be used as part of workflows that require:
- Queue-based task processing.
- Form-based review or approval.
- Routing work to a particular operational queue.
- Providing task-specific instructions.
- Controlling which form fields or subforms are hidden or read-only.
- Prioritizing tasks or queues.
- Applying task completion or expiration settings.
- Continuing the workflow through the
completedorrejectedreturn paths.

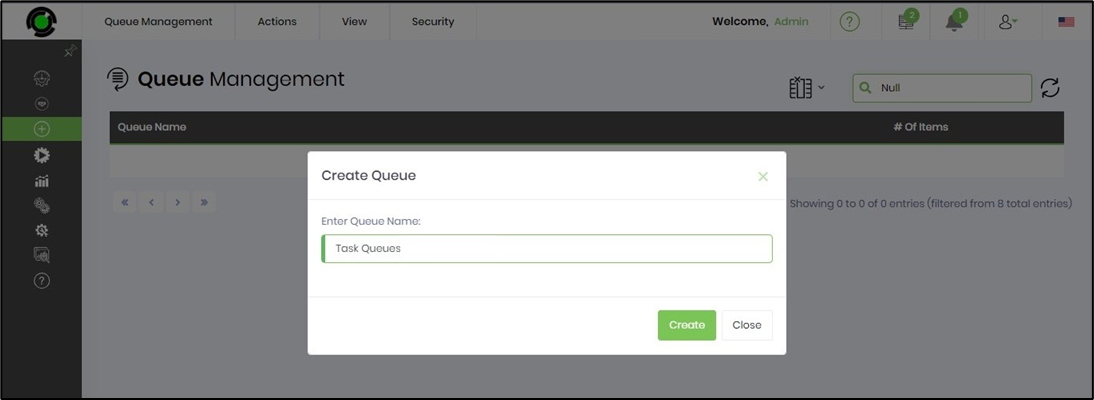
A queue must be configured in the FlowWright Application to use this step. Navigate to Create, then select the Queue Management menu option. If configured previously, the page displays all queues. Select Action > Create, then enter a queue name, as shown in the image below.
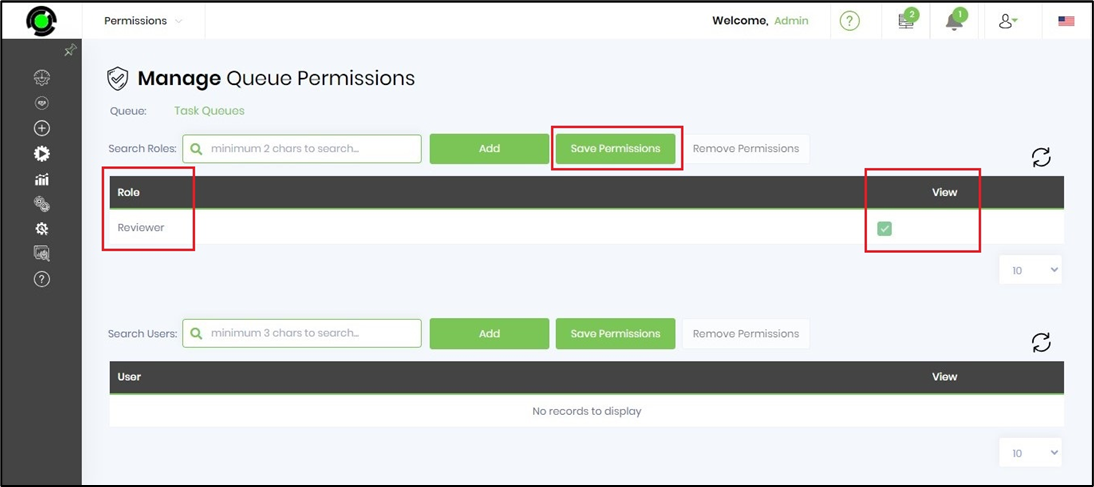
Select the queue from the table, then click Security > Permissions. The Manage Queue Permissions page appears. Search for and add application roles and/or users. Click Save Permissions to confirm the permissions. In the example below, the Reviewer app role (users) has View permissions on the Task Queues. User access privileges may be modified as needed.
Typical Workflow Suggestions:
Route a Form for Review
Use the step when a workflow needs to send a form task to a designated queue for review.
Example:
Submit Form → Route Form to Queue → Review Task
Configure the queue, task description, form definition, and form instance for the review activity.
Route Tasks to Different Queues
Use separate Route Form to Queue steps when different workflow paths require different queues.
Example:
Evaluate Request → Route Form to Queue → Department Processing
Each workflow path can be configured with the appropriate queue.
Provide Detailed Task Instructions
Use the Task description and Task detail description properties to give queue users the information they need to work on the task.
Example:
Task description:
Review Customer Request
Task detail description:
Verify the submitted information and complete the required review fields.
The task description is a required property, while the detailed description is optional.
Route an Existing Form Instance
Use the formInstanceID configuration when the workflow already has a form instance ID stored in a Variable, Global, or FormVariable.
Example:
Create/Obtain Form Instance → Route Form to Queue → Process Form
The step definition explicitly provides a selectFormVariable data type for selecting the Variable, Global, or FormVariable that holds the form instance ID.
Control Form Field Visibility
Use Set form fields hidden or readOnly when the routed task should have specific form fields configured as hidden or read-only.
Example:
Complete Initial Form → Route Form to Queue → Review Form
This can be useful when the next queue should review information without modifying selected fields. The XML identifies this configuration as the hideReadOnlyFields property type.
Control Subform Visibility
Use Set subforms hidden or readOnly when the workflow needs to configure subform visibility or read-only state for the routed task.
Example:
Prepare Form → Route Form to Queue → Queue Review
The step provides a separate hideReadOnlySubForms property type for this purpose.
Prioritize Queue Work
Use Task Priority and Queue Priority when the workflow needs to configure priority information for the routed task and queue.
Example:
Evaluate Request → Route Form to Queue → Priority Processing
Both properties use the selectPriority data type.
Configure Task Expiration
Use Task expire type and Complete the task in when a workflow requires task completion or expiration settings.
Example:
Assign Review → Route Form to Queue → Complete Review
The step also provides an Include weekends option for the task completion configuration.
Handle Completed and Rejected Paths
Connect the completed and rejected return paths to different downstream activities when the workflow requires separate handling.
Example:
Route Form to Queue → Completed Processing
and
Route Form to Queue → Rejected Processing
The step explicitly defines these two return values.
Route Approval Tasks
Use the step in approval workflows where a submitted form must be routed to a review queue.
Example:
Form Submission → Validate Request → Route Form to Queue → Approval Processing
Task descriptions and priorities can be configured to provide context for the queue-based activity.
Route Exception or Rework Tasks
Use the step when an exception or rework condition requires a form task to be sent back into a queue for additional processing.
Example:
Validate Request → Exception → Route Form to Queue → Rework
The task description and detailed description can be used to explain the reason for the rework.
Example:
Let’s build and execute the “RouteFormToQueueDef” example and assign a task to the queue.
- Create a new definition named “RouteFormToQueueDef” and open it in designer mode.
- Drag a “RouteFormToQueue” step from the toolbox to the canvas
- Connect the dots between the Start and the “RouteFormToQueue” step
- Click the “RouteFormToQueue” step to configure its “Settings” properties. Enter a step name. Select the queue from the dropdown list. Enter a task description. Select the Form Definition from the dropdown list to route the form to the queue. Enter a variable or global reference to store the Form Instance ID. Click the Save button. Note: Click the "AI Predict" button to have the Copilot add new process steps that match your process description.

- Click the “RouteFormToQueue” step to configure its “Optional” properties, as shown in the graphic below. Provide a task description. Configure the Form and subForm fields to show or hide at runtime. Select the task priority from the list (low, medium, high, normal, urgent). Select the task expiration type (days, hours, months, minutes). Provide the task completion duration. Select Include weekends if desired. Click the Save button to save the configuration.

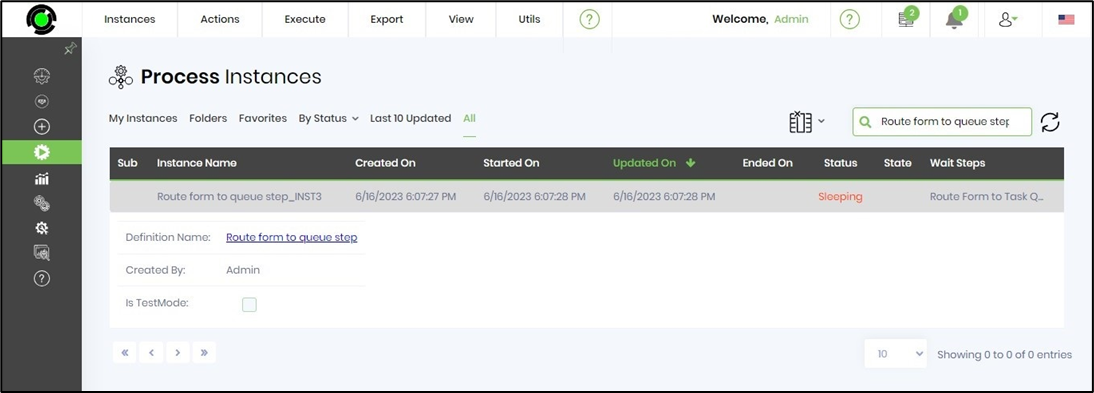
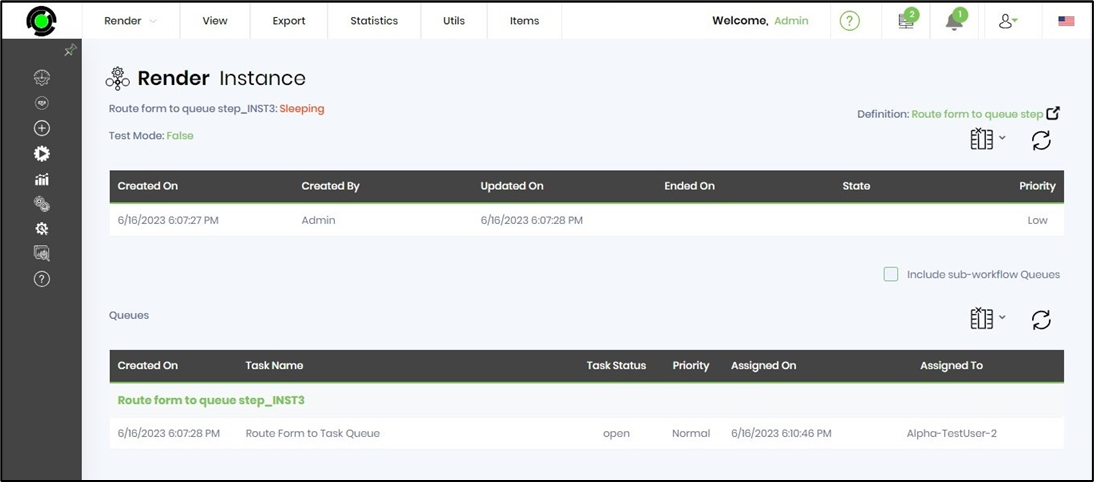
- Save the process definition, create an instance, and execute it. When the workflow reaches the Route Form to Queue step, the configured form task is routed according to the step configuration. Navigate to Run > Process Instance, select the process instance, then choose View > Render.
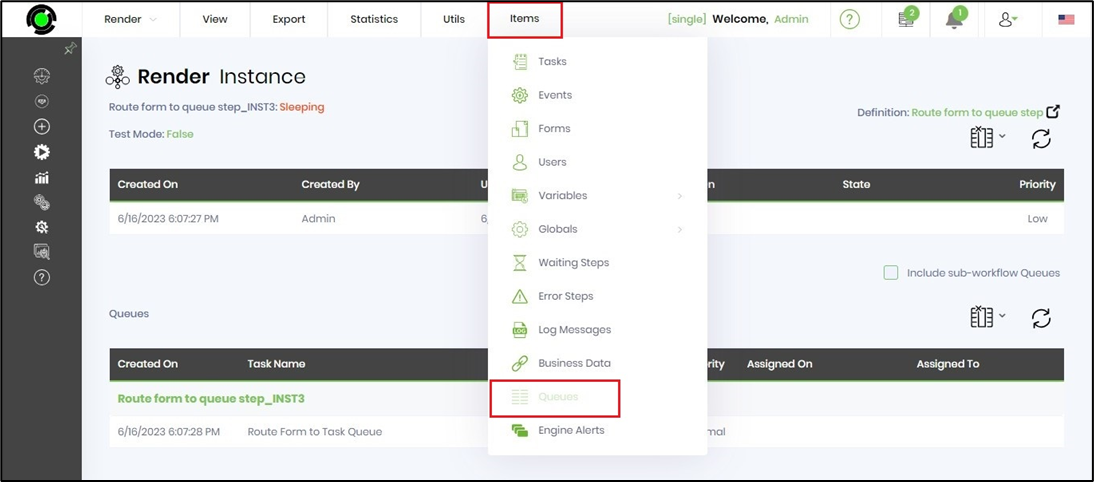
- On the Render Instance page, select Items > Queues to view the tasks assigned to the queue.
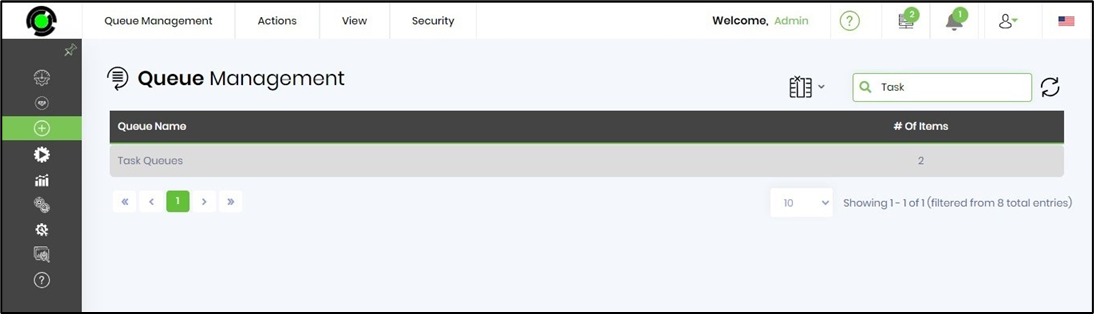
- Navigate to the Create - Queue Management page to view the number of items in the queue.
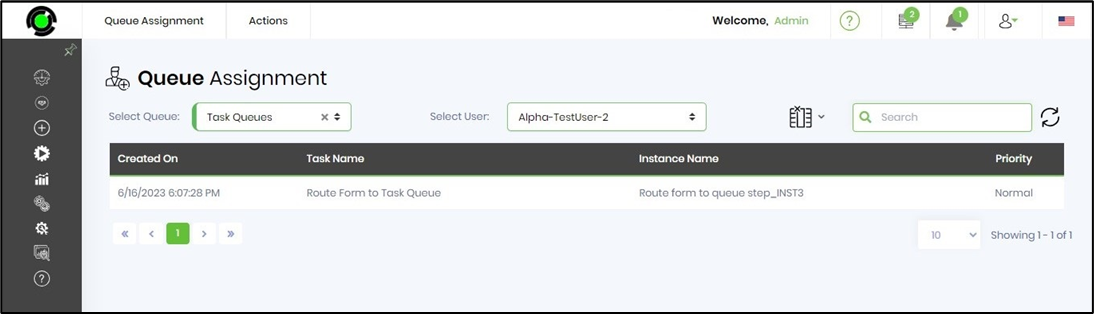
- Navigate to the Engage—Task—Queue Assignment page and select the queue from the dropdown. As configured, the queue will be visible to the application role (users).
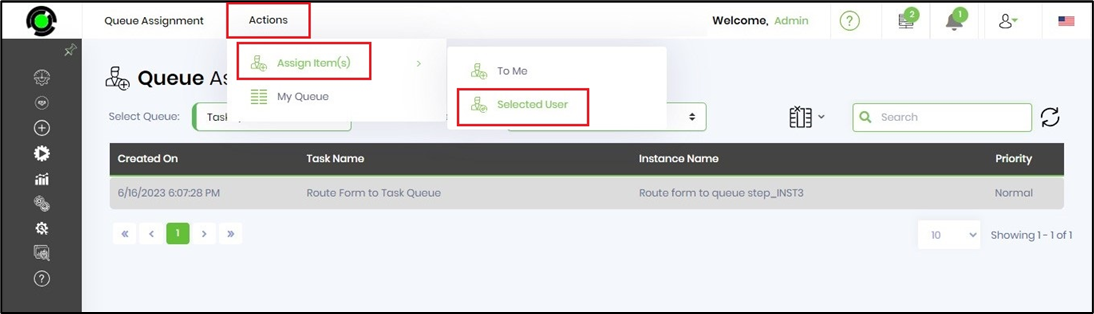
- Here, users can select a task from the queue and assign it to themselves or another user.
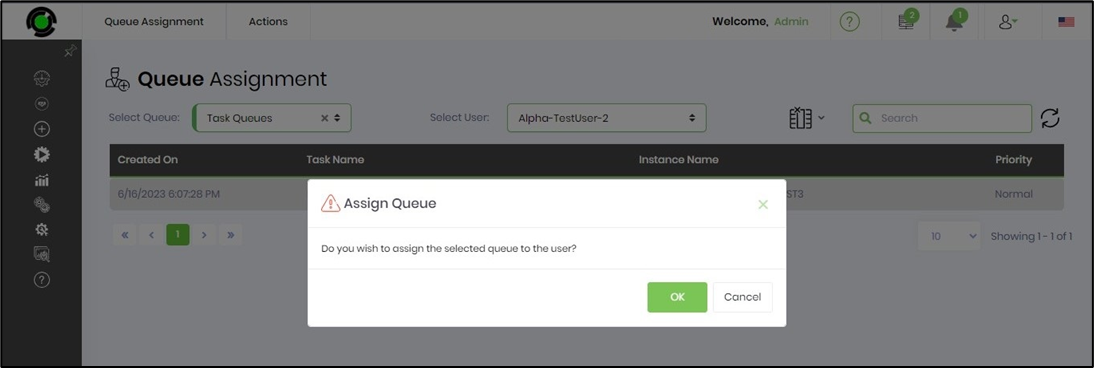
- Click OK to confirm the queue assignment.
- Refresh the process instance page. The task in the queue has been assigned to the selected user.
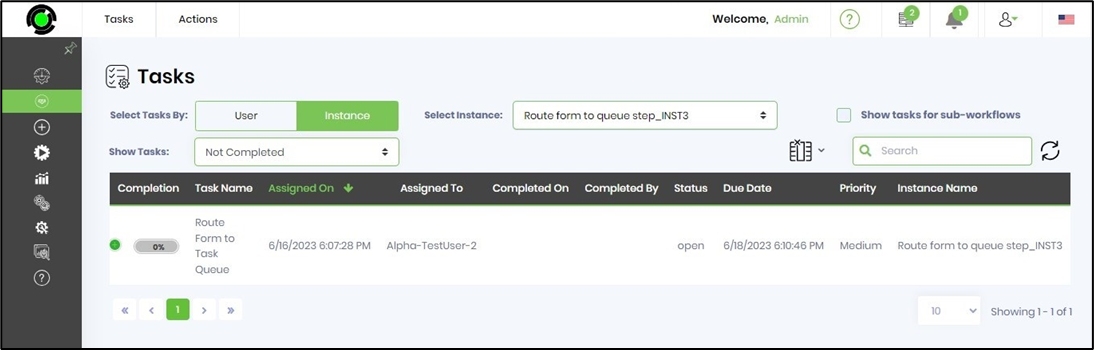
- Navigate to the Engage - Tasks page to view the task assigned to the user by the selected process instance.
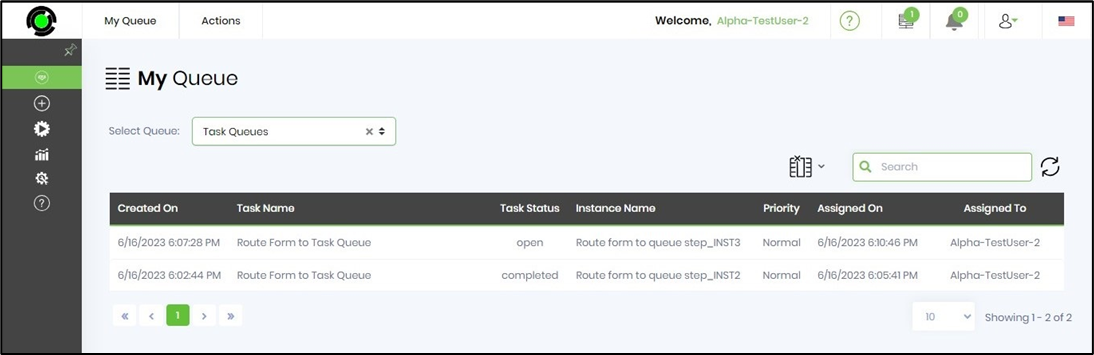
- To view all tasks assigned to the queue, the application role (users) navigates to the Engage—Task—My Queue page and selects the queue from the dropdown list, as shown below.
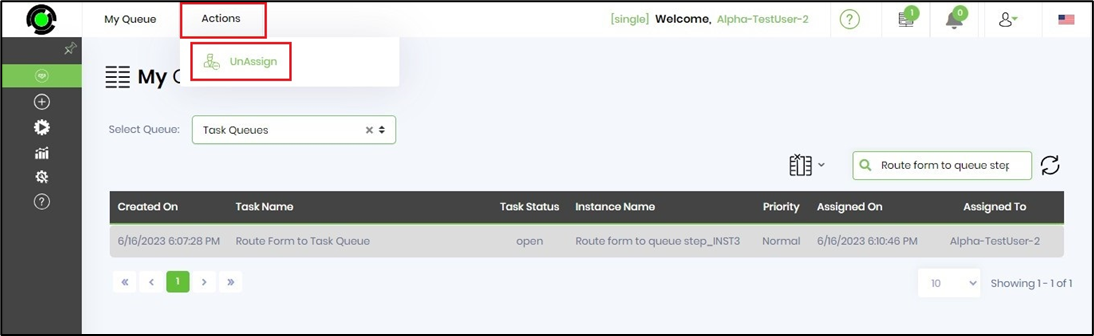
- To unassign the OPEN task from the user, select Actions > Unassign; the task is returned to the queue.
Tips:
- Always configure the required Select queue to route to property.
- Provide a meaningful Task description so the purpose of the routed task is clear.
- Use Task detail description when additional instructions or context are required.
- Verify that the selected form definition is the intended form for the task.
- Make sure the configured Variable, Global, or FormVariable contains the appropriate form instance ID.
- Use field and subform visibility settings deliberately when controlling what the task user can see or modify.
- Use meaningful task and queue priorities when prioritization is important.
- Test task expiration settings with representative workflow scenarios.
- Verify whether weekends should be included when configuring task completion periods.
- Connect both
completedandrejectedpaths to appropriate downstream workflow activities. - Test the workflow with realistic form instances before deploying it.
- Verify the routed task in the target queue during testing.
- Do not assume the exact semantics of
completedandrejectedbeyond the return values defined by the step; confirm the runtime behavior in the FlowWright implementation. - Do not assume the accepted format of Complete the task in without confirming it in the target FlowWright environment.
- When importing or reusing process definitions, verify queue, form, form-instance, and environment-specific configuration before execution.
Notes:
- The Route Form to Queue step is defined in the Forms category with the internal name
routeformtoqueue, label “Route a form task to a selected queue”, and display name “Route Form to Queue.” - The step is implemented by
FlowWright.Workflow.RouteFormToQueueinFlowWright.Workflow.dlland is defined as a Process step with 2 incoming connections and 2 outgoing connections. - The step defines the following properties:
-
selectQueue– Select queue to route to. -
taskDesc– Task description. -
taskBody– Task detail description. -
formDefinition– Select form definition. -
formInstanceID– Variable/Global/FormVariable holds the form instance ID. -
hideReadOnlyFields– Set form fields hidden or read-only. -
hideReadOnlySubForms– Set subforms hidden or read-only. -
taskPriority– Task Priority. -
queuePriority– Queue Priority. -
expireType– Task expire type. -
daysToComplete– Complete the task in. -
includeWeekends– Include weekends.
-
- Four properties are required:
selectQueue,taskDesc,formDefinition, andformInstanceID. The remaining properties are optional. - The property types are implemented by the following FlowWright data types:
-
QueueList–FlowWright.DataTypes.QueueList -
string–FlowWright.DataTypes.ClsTextBox -
multilineTextBox–FlowWright.DataTypes.ClsMultilineBox -
selectFormDefintions–FlowWright.DataTypes.SelectFormDefintions -
selectFormVariable–FlowWright.DataTypes.SelectFormVariable -
hideReadOnlyFields–FlowWright.DataTypes.ClsHideReadOnlyFields -
hideReadOnlySubForms–FlowWright.DataTypes.ClsHideReadOnlySubForms -
selectPriority–FlowWright.DataTypes.ClsPriority -
TaskExpireType–FlowWright.DataTypes.TaskExpireType -
checkbox–FlowWright.DataTypes.ClsCheckBox.
-
- The step provides two return values:
completedandrejected.
Definition Sample:
You may provide a sample definition for download, then import it into your FlowWright Process Definition (XML file) or Form Definition (HTML file) page.
Note: Verify and complete any missing configuration after importing the sample, including:
- Queue selection.
- Task description.
- Task detail description, if required.
- Form definition.
- Variable, Global, or FormVariable containing the form instance ID.
- Form field visibility settings.
- Subform visibility settings.
- Task priority.
- Queue priority.
- Task expiration configuration.
- Completion period.
- Weekend configuration.
- Downstream
completedandrejectedworkflow paths. - Environment-specific settings.
After verifying the configuration, save the Process Definition before execution.