AddFormFileAttachments Step
Description:
The Add Attachments step enables a FlowWright workflow to upload and associate one or more files with file upload controls within an existing form instance.
Many business processes require documents such as invoices, contracts, reports, images, certificates, or supporting files to be attached to workflow forms. Rather than requiring users to manually upload these files, this step allows workflows to automatically populate file upload controls with files generated during workflow execution or retrieved from external systems.
The step identifies the target form instance, optionally identifies the associated form definition, and uses configurable mappings between form file controls and physical files to upload. It also provides an option to ignore missing files when configured, allowing workflows to continue execution in scenarios where certain optional documents are unavailable.
Typical uses include:
- Attaching generated PDF reports
- Uploading contracts and agreements
- Associating invoices with approval forms
- Adding engineering drawings
- Uploading compliance certificates
- Importing files received from external systems
- Attaching workflow-generated documents
- Populating document-centric approval forms
This step enables organizations to automate document management within FlowWright forms while ensuring that required business documents are available throughout the workflow lifecycle.
Inputs
- Variable/Global/FormVariable Holds the Form Instance ID - Specifies the workflow variable, global variable, or form variable containing the target form instance identifier. This property is required.
- Select Form Definition - Optionally specifies the form definition associated with the form instance.
- Mapping of File Control ID to Upload - Specifies one or more mappings between file upload controls and the files that should be uploaded to those controls.
- Ignore Not Found Files - Specifies whether the workflow should continue execution when one or more mapped files cannot be found.
Returns
- True – The specified file attachments were successfully added to the form instance. Workflow execution continues through the success path.
- False - One or more files could not be uploaded because of an invalid form instance, incorrect mappings, missing files, insufficient permissions, or another execution error. Workflow execution follows the alternate path.
Usage:
The Add Attachments step is typically used after documents have been generated, imported, or downloaded and need to be associated with a FlowWright form.
During execution:
- Locate the target form instance.
- Optionally validate the selected form definition.
- Read the configured file control mappings.
- Upload the specified files to the corresponding file upload controls.
- Update the form instance with the new attachments.
- Continue workflow execution through either the True or False return path.
A typical workflow might look like this:

Typical workflow scenarios include:
- Attaching generated reports to workflow forms
- Uploading invoices during approval processes
- Associating contracts with procurement workflows
- Adding supporting documentation to HR forms
- Importing files received through REST APIs
- Uploading engineering specifications
- Attaching quality assurance documents
- Populating customer onboarding forms with required documents
Example:
Let's build and execute the “addFormFileAttachmentsDef” example.
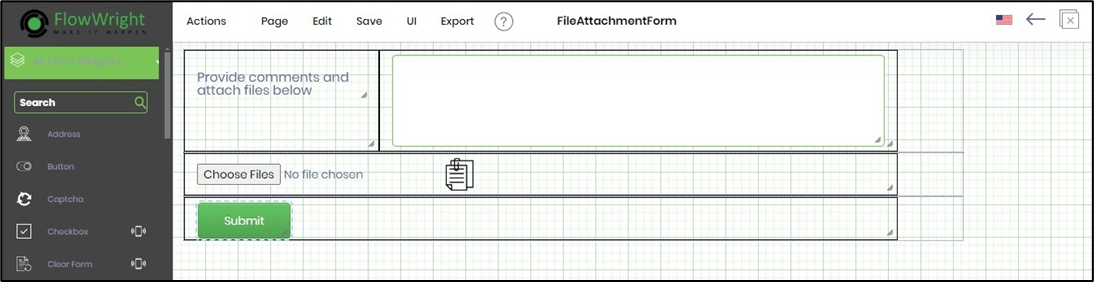
- Create a new Form definition called “FileAttachmentForm". Drag and arrange the Form controls “BootstrapGrid, Labels, TextArea, AttachFiles, FileList” as shown below.
- Create a new process definition named “addFormFileAttachmentsDef” and open it in designer mode. Drag the process steps above to the canvas and connect them as shown below.
- Click the “routeForm” step to configure its “Required” properties. Provide a name for the step and a task description. Select a Form Definition from the drop-down list. Provide a variable or global to store the Form Instance ID. Click the Save button. Note: Click the "AI Predict" button for the Copilot to add new process steps that match your process description.

- Click the “routeForm” step to configure its “Optional” properties. Provide a task description. Click the button to configure the users who route the form. Click the button to configure the application role users who route the form. Select the task priority from the drop-down list. Provide the task completion duration using the UI fields.

- Click the “addFormFileAttachments” step to configure its “Required” properties. Provide the variable or global reference that holds the Form Instance ID.

- Click the “addFormFileAttachments” step to configure its “Optional” properties. Select the Form definition from the dropdown list. Map the file list to the file “Control ID”. Provide the file path on the application server or the DMS file storage folder, as shown below. The “addFormFileAttachments” step shall attach this file to the Form Instance at runtime.

- Use the "getFileAttachments" step to fetch all file attachments from the Form Instance to confirm the “addFormFileAttachments” step. Click the “getFileAttachments” step to configure its “Required” properties. Provide a name for the step. Provide a variable or global reference to hold the “Form Instance ID”. Provide a variable or global reference to store the file attachment paths and file attachment names.

- Click the “getFileAttachments” step to configure its “Optional” properties. Select the Form Definition from the dropdown list. Click the button to map the file list to the file “Control ID” for upload at runtime.

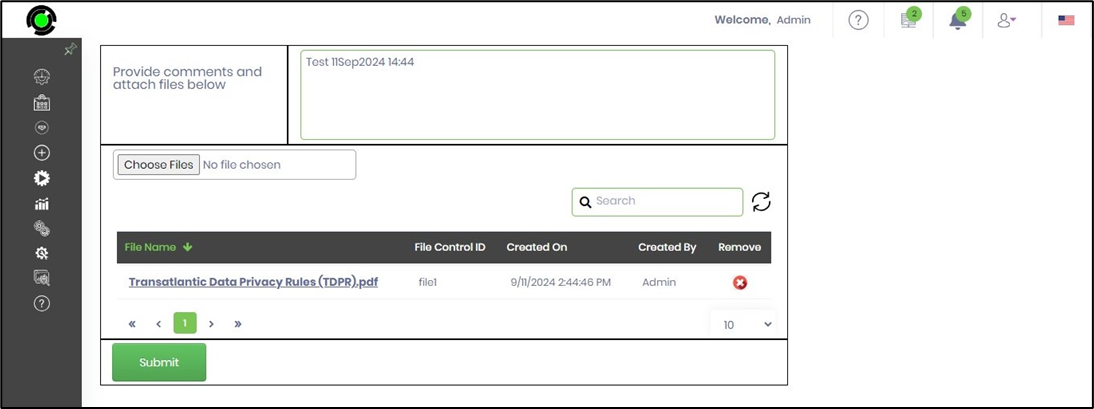
- Save the process definition, create a new instance, and execute it. Render the process instance to view the workflow. The “routeForm” step routes a form task to the user. In this example, the user attaches a file and submits the Form.
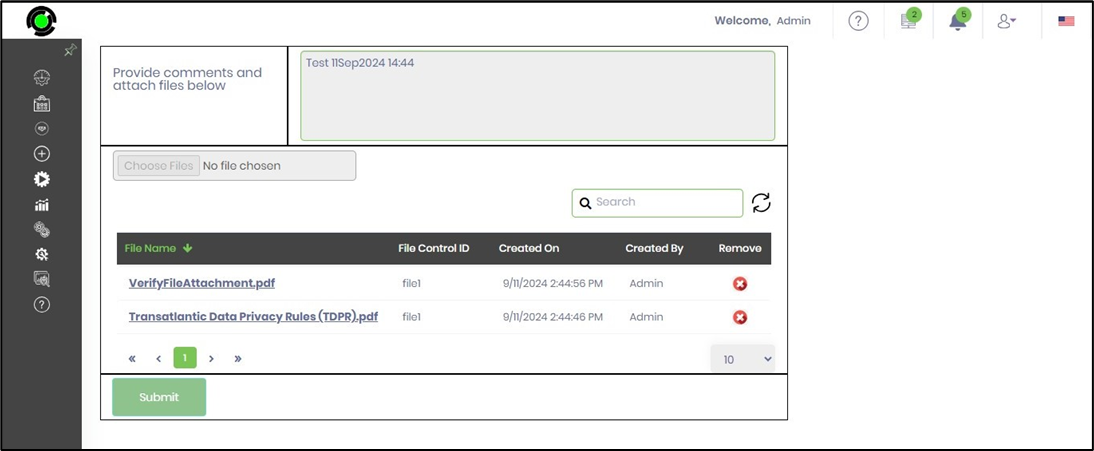
- The "addFormFileAttachment" step shall add a different set of files to the Form instance.

- The file list is retrieved using the "getFileAttachments" step. The “routeForm” step redirects the Form back to the user. In this example, a different set of files is added to the Form Instance.
Security - Permissions:
Click the link here to understand the security permissions available for Form File Attachments.
Tips:
- Generate or retrieve files before executing this step.
- Configure file control mappings carefully to ensure each document is uploaded to the correct file upload control.
- Use Ignore Not Found Files when optional documents should not prevent workflow completion.
- Route the False execution path to logging and notification activities for easier troubleshooting.
- Verify that the target form instance exists before attempting to upload attachments.
- Combine this step with Generate PDF, REST Call, Archive Form Instance, Remove Form File Attachments, or document management steps to automate complete document lifecycle workflows.
Feature Comparison:
Add Attachments vs. Remove Form File Attachments:
Although both workflow steps manage attachments associated with FlowWright form instances, they perform opposite operations.
| Add Attachments | Remove Form File Attachments |
|---|---|
| Uploads new file attachments to form file upload controls. | Removes existing file attachments from form file upload controls. |
| Uses Add Form File Field Mappings to identify files that should be uploaded. | Uses Remove Form File Field Mappings to identify files that should be removed. |
| Supports an optional Ignore Not Found Files setting. | Does not provide an Ignore Not Found Files option. |
| Requires a form instance identifier. | Requires a form instance identifier. |
| Typically used after document generation or document retrieval. | Typically used before document replacement or cleanup activities. |
As a general guideline:
- Use Add Attachments when workflows need to upload generated reports, contracts, invoices, images, or supporting documents into existing form instances.
- Use Remove Form File Attachments when workflows need to delete outdated, duplicate, or obsolete attachments before updating or archiving form data.
Definition Sample:
You may download the sample workflow definition from the link provided and import it into your FlowWright environment.
Note: Verify and complete any missing configuration after importing the sample, including:
- Form instance identifier
- Optional form definition
- File control mappings
- Ignore Not Found Files option
- Success and failure workflow branches
- Appropriate permissions to modify the target form instance
After verifying the configuration, save and publish the workflow before execution.
Click here to download the sample XML file.
Click here to download the sample HTML file.