xmlCompare Step
Description:
The Compare XML step enables a FlowWright workflow to compare two XML documents and identify differences.
Many business processes exchange XML data between systems, making it necessary to detect additions, removals, or changes over time. Instead of manually comparing XML documents, this step automates the process by comparing two XML datasets and identifying items that exist only in the first (new items) and those that exist only in the second (removed items).
Optionally, the comparison can be limited to a specified list of columns, allowing workflows to compare only selected fields rather than entire XML records.
The workflow specifies the two XML documents to compare, an optional list of comparison columns, and the workflow variables or global values that will receive the comparison results.
Typical uses include:
- Synchronizing master data between systems
- Detecting newly added records
- Identifying deleted records
- Comparing import and export datasets
- Auditing XML data changes
- Validating data synchronization processes
- Comparing application configuration files
- Preparing change reports for downstream workflows
This step helps organizations automate XML comparison while improving data validation and synchronization accuracy.
Inputs
- Xml1 - Specifies the first XML document to compare. This document is treated as the source for identifying newly added items.
- Xml2 - Specifies the second XML document to compare. This document is treated as the source for identifying removed items.
- List of Columns to Compare - (Optional) Specifies a comma-separated list of XML columns or fields that should be used during the comparison. If omitted, the complete XML content is compared.
- Variable/Global to Store Xml1 New Items - Specifies the workflow variable or global value that will receive items found in Xml1 but not in Xml2.
- Variable/Global to Store Xml2 Removed Items - Specifies the workflow variable or global value that will receive items found in Xml2 but not in Xml1.
Returns
- True – The XML comparison completed successfully and the comparison results were stored in the configured workflow variables or global values. Workflow execution continues through the success path.
- False – The comparison could not be completed because of invalid XML, incompatible XML structures, invalid comparison columns, missing input data, or another execution error. Workflow execution follows the alternate path.
Usage:
The Compare XML step is typically used after XML documents have been generated, imported, or retrieved from external systems and before synchronization, reporting, notification, or data update activities.
During execution:
- Read the first XML document.
- Read the second XML document.
- Optionally limit the comparison to the configured list of columns.
- Compare the XML datasets.
- Identify items present only in Xml1.
- Identify items present only in Xml2.
- Store the comparison results in the configured workflow variables or global values.
- Continue workflow execution through either the True or False return path.
A typical workflow might look like this:

Typical workflow scenarios include:
- Comparing employee records synchronized from Active Directory
- Detecting changes in customer master data
- Identifying newly added inventory items
- Comparing exported ERP datasets
- Synchronizing application configuration files
- Detecting differences between scheduled XML snapshots
- Validating system integration results
Example:
Let’s build and execute the “xmlCompareDef” example.
- Create a new definition called “xmlCompareDef” and open the definition in designer mode.
- Drag an “UpdateVariables” and "xmlCompare" step to the canvas
- Connect the dots between the “Start” and other steps, as shown above.
- Select the line between the steps to configure the “Connection Properties”. The default property values are “None, Error, Evaluate, and Timeout”. Depending on the step’s purpose, additional values are available for configuration.
- Define a variable or a global to store the XML data for comparison.
- Define a variable or a global to store the comparison result (for both new and removed).
- Click the "UpdateVariables" step to configure its “Required” properties. Provide a name for the step. Click the Save button. Note: Click the "AI Predict" button to have Copilot add new process steps that match your process description.

- Click the "UpdateVariables" step to configure its “Optional” properties. Click the button to define multiple variables and their values. Click the Add Row (+) button to insert an empty row. Enter a variable name and XML value as shown below. Click the Save button. You may add multiple variables by using the Add Row button.

- The XML data used for variables.varXML1 (for reference).
<SQLData>
  <Row>
    <PROJECTID>9268</PROJECTID>
    <PROCUREMENTTYPEID>20</PROCUREMENTTYPEID>
    <ROWNO>1</ROWNO>
    <PROCESSID>eef9a64e-c2bb-4f4f-99df-a5201d841e42</PROCESSID>
    <RowID>0</RowID>
  </Row>
  <Row>
    <PROJECTID>9268</PROJECTID>
    <PROCUREMENTTYPEID>24</PROCUREMENTTYPEID>
    <ROWNO>1</ROWNO>
    <PROCESSID>a3784005-c8d6-43f1-b5bc-05583b9ea617</PROCESSID>
    <RowID>1</RowID>
  </Row>
  <Row>
    <PROJECTID>9268</PROJECTID>
    <PROCUREMENTTYPEID>36</PROCUREMENTTYPEID>
    <ROWNO>1</ROWNO>
    <PROCESSID>617b40af-2a9b-4ae0-8356-73410d2fb22c</PROCESSID>
    <RowID>2</RowID>
  </Row>
</SQLData>
- The XML data used for variables.varXML2 (for reference).
<SQLData>
  <Row>
    <PROJECTID>9268</PROJECTID>
    <PROCUREMENTTYPEID>20</PROCUREMENTTYPEID>
    <ROWNO>1</ROWNO>
    <RowID>0</RowID>
  </Row>
  <Row>
    <PROJECTID>9268</PROJECTID>
    <PROCUREMENTTYPEID>20</PROCUREMENTTYPEID>
    <ROWNO>2</ROWNO>
    <RowID>1</RowID>
  </Row>
  <Row>
    <PROJECTID>9268</PROJECTID>
    <PROCUREMENTTYPEID>24</PROCUREMENTTYPEID>
    <ROWNO>1</ROWNO>
    <RowID>2</RowID>
  </Row>
  <Row>
    <PROJECTID>9268</PROJECTID>
    <PROCUREMENTTYPEID>24</PROCUREMENTTYPEID>
    <ROWNO>2</ROWNO>
    <RowID>3</RowID>
  </Row>
  <Row>
    <PROJECTID>9268</PROJECTID>
    <PROCUREMENTTYPEID>36</PROCUREMENTTYPEID>
    <ROWNO>1</ROWNO>
    <RowID>4</RowID>
  </Row>
  <Row>
    <PROJECTID>9268</PROJECTID>
    <PROCUREMENTTYPEID>36</PROCUREMENTTYPEID>
    <ROWNO>2</ROWNO>
    <RowID>5</RowID>
  </Row>
  <Row>
    <PROJECTID>9268</PROJECTID>
    <PROCUREMENTTYPEID>38</PROCUREMENTTYPEID>
    <ROWNO>1</ROWNO>
    <RowID>6</RowID>
  </Row>
</SQLData>
- Click the "xmlCompare" step to configure its “Required” properties. Provide a name for the step. Provide variable or global references for XML1 and XML2. Provide variable or global references to store new items in XML1 and removed items in XML2. Click the Save button. Note: Click the "AI Predict" button for the Copilot to add new process steps that match your process description.

- Click the "xmlCompare" step to configure its “Optional” properties. Enter the shared column names (comma-separated) to use for comparison. Click the Save button.

- The “Logging” configuration is necessary for documentation and also measures workflow progress and percent complete. This is achieved by configuring the step state and percent fields individually, as shown in the images below. Configure the “Logging” using the following properties.

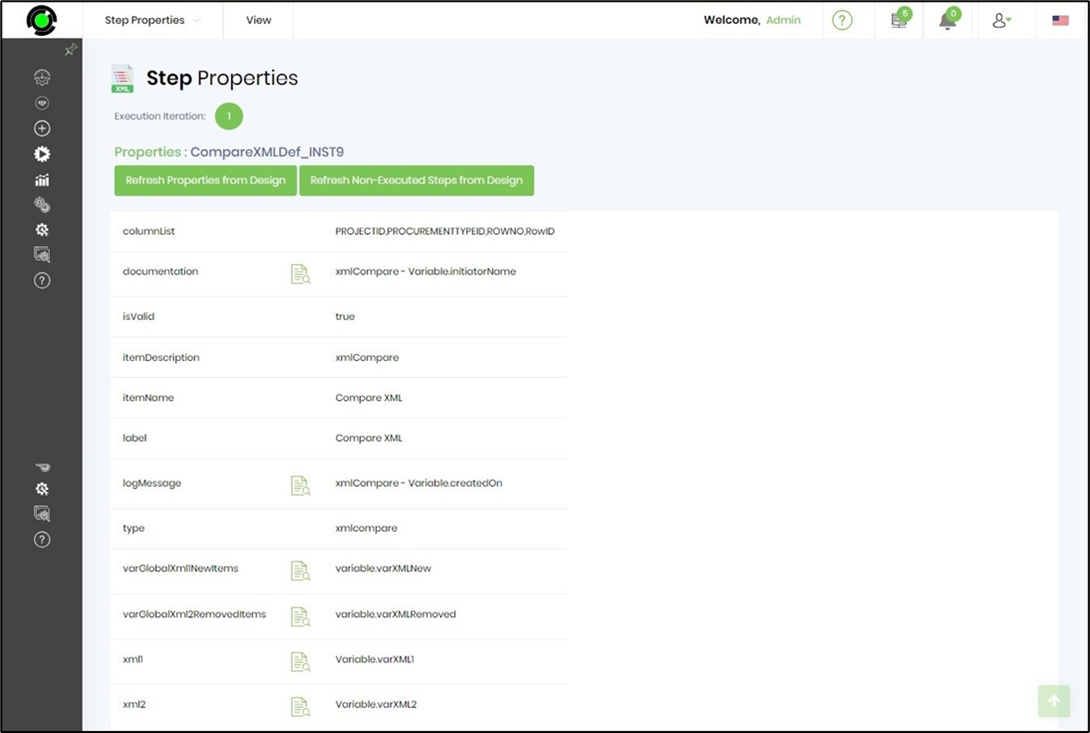
- Save the process definition, create a process instance, and execute it. The process step should compare two XML data sets, return new items from the first, and remove items from the second. Navigate to Administration - Run - Process Instance, then select the process instance to render. Click the xmlCompare step to view the properties. Click the varGlobalXML1NewItems icon to view the new items after comparison. Click the varGlobalXML2RemovedItems icon to view the duplicate items removed after comparison.
- The XML result set for varGlobalXML1NewItems after comparison (for reference).
<SQLData>
  <Row>
    <PROJECTID>9268</PROJECTID>
    <PROCUREMENTTYPEID>24</PROCUREMENTTYPEID>
    <ROWNO>1</ROWNO>
    <PROCESSID>a3784005-c8d6-43f1-b5bc-05583b9ea617</PROCESSID>
    <RowID>0</RowID>
  </Row>
  <Row>
    <PROJECTID>9268</PROJECTID>
    <PROCUREMENTTYPEID>36</PROCUREMENTTYPEID>
    <ROWNO>1</ROWNO>
    <PROCESSID>617b40af-2a9b-4ae0-8356-73410d2fb22c</PROCESSID>
    <RowID>1</RowID>
  </Row>
</SQLData>
- The XML result set for varGlobalXML2RemovedItems after comparison (for reference).
<SQLData>
  <Row>
    <PROJECTID>9268</PROJECTID>
    <PROCUREMENTTYPEID>20</PROCUREMENTTYPEID>
    <ROWNO>2</ROWNO>
    <RowID>0</RowID>
  </Row>
  <Row>
    <PROJECTID>9268</PROJECTID>
    <PROCUREMENTTYPEID>24</PROCUREMENTTYPEID>
    <ROWNO>1</ROWNO>
    <RowID>1</RowID>
  </Row>
  <Row>
    <PROJECTID>9268</PROJECTID>
    <PROCUREMENTTYPEID>24</PROCUREMENTTYPEID>
    <ROWNO>2</ROWNO>
    <RowID>2</RowID>
  </Row>
  <Row>
    <PROJECTID>9268</PROJECTID>
    <PROCUREMENTTYPEID>36</PROCUREMENTTYPEID>
    <ROWNO>1</ROWNO>
    <RowID>3</RowID>
  </Row>
  <Row>
    <PROJECTID>9268</PROJECTID>
    <PROCUREMENTTYPEID>36</PROCUREMENTTYPEID>
    <ROWNO>2</ROWNO>
    <RowID>4</RowID>
  </Row>
  <Row>
    <PROJECTID>9268</PROJECTID>
    <PROCUREMENTTYPEID>38</PROCUREMENTTYPEID>
    <ROWNO>1</ROWNO>
    <RowID>5</RowID>
  </Row>
</SQLData>
Tips:
- Limit comparisons to key columns when only specific fields determine record uniqueness.
- Ensure both XML documents follow a compatible structure before comparison.
- Use descriptive workflow variable names for the comparison results.
- Review comparison results before automatically deleting or synchronizing records.
- Store XML snapshots for audit and troubleshooting purposes.
- Route the False path to logging or notification activities for easier troubleshooting.
- Combine this step with XML to JSON Converter, Ask AI, Update Variable Values, Send Email, or database update steps to build complete synchronization workflows.
Notes:
- Both Xml1 and Xml2 are required.
- The List of Columns to Compare property is optional.
- Comparison results are stored in the configured workflow variables or global values.
- The XML supplied to both inputs should use compatible schemas for meaningful comparison results.
- Downstream workflow activities can process the new and removed item collections independently.
- Both the True and False return paths should be implemented to provide complete workflow handling.
- Execution details and comparison activities are recorded in the FlowWright workflow execution log.
Compare XML vs. clsXMLToJSONConverter:
Both workflow steps process XML data, but they address different integration requirements.
| Compare XML | clsXMLToJSONConverter |
|---|---|
| Compares two XML documents and identifies differences between them. | Converts an XML document into JSON format. |
| Focuses on change detection and data synchronization. | Focuses on data format transformation for interoperability. |
| Accepts two XML inputs and optionally compares selected columns. | Accepts a single XML document and produces an equivalent JSON representation. |
| Produces two result sets: new items and removed items stored in workflow variables or global values. | Produces JSON output that can be consumed by REST APIs, web services, or downstream applications. |
| Ideal for synchronization, auditing, change detection, and validation workflows. | Ideal for system integration, API communication, JavaScript applications, and JSON-based processing. |
As a general guideline:
- Use Compare XML when workflows need to identify differences between two XML datasets, detect additions or removals, or synchronize data between systems.
- Use clsXMLToJSONConverter when workflows need to convert XML data to JSON for REST APIs, web services, cloud integrations, or applications that consume JSON.
Definition Sample:
You may download the sample workflow definition from the link provided and import it into your FlowWright environment.
Note: Verify and complete any missing configuration after importing the sample, including:
- First XML document
- Second XML document
- Optional comparison column list
- Workflow variables or global values for new and removed items
- Success and failure workflow branches
- Validation of XML document structure
After verifying the configuration, save and publish the workflow before execution.