Task Step
Description:
The Task workflow step creates a human task and routes it to selected FlowWright users, roles, or specified email addresses.
The step is designed for workflow activities that require human participation, such as reviewing information, approving a request, performing an operational activity, or completing a business-process task.
The step supports:
- Routing tasks to selected users.
- Routing tasks to selected roles.
- Routing tasks to email addresses.
- Providing a task description and detailed instructions.
- Routing an item associated with the task.
- Displaying a URL associated with the task.
- Setting task priority and completion duration.
- Configuring task expiration.
- Including or excluding weekends when calculating duration.
- Defining task-routing rules.
- Configuring task reminders.
- Waiting for all assigned users to respond.
- Storing the routed user list in a Variable or Global.
- Sending task email notifications.
- Sending separate emails to recipients.
- Configuring the sender, subject, body, CC list, and attachments for task notifications.
- Sending notifications when a task expires.
- Sending acknowledgment links.
- Customizing approval and rejection button labels.
- Hiding the reject button.
- Allowing users to reassign the task.
- Requiring a comment when completing the task.
This step routes a task to a specified number of users. The user can upload files to the task and complete it. These files are stored on the application server's file system or in the DMS file storage folder, whose configuration is defined in the “Start” process step.
Inputs
- routeTo – Select users to route to
- routeToRoles – Select roles to route to
- taskDesc – Description of the task
- taskBody – Body of the task/task description
- routedItem – Item that is routed
- showURL – URL to render within the task
- emailAddresses - Email addresses to route the task to
- priority – Priority of the task
- daysToComplete - # of days, minutes, hours, and months to complete the task by
- expiryType – Task expiry type
- includeWeekends – Include Weekends
- useFullDuration - the task uses the full duration and continues
- taskRoutingRules- Task routing rules types
- taskReminder- Set task reminder to send reminder emails
- waitForAll – Yes = all users must act on the task, No = requires only 1 user to act on the task
- storeRouteToUsers – variable to store what users the task was routed to
- sendEmailNotifications – Yes = email notification will be sent to each user for the task
- fromEmail – From email address
- emailSubject – Subject of the email message
- emailBody – Body of the email message
- emailFiles – Email file attachments
- sendExpireEmail - Send expired email notification
- sendAckLink - Send acknowledgment link
- approveButtonLabel--Label for approval button
- rejectButtonLabel--Label for reject button
- hideRejectButton--Hide reject button
- userCanReAssign – Yes/No. Users can reassign tasks to another active user during runtime.
- commentRequired - User comments are required
Returns
- Closed - The closed return path can be used when the task is closed without following the normal completion path.
- Completed – The completed return path represents normal successful completion of the task.
- Rejected – The rejected return path can be used when the recipient rejects the task or request.
- Timeout - The timeout return path is used when the task reaches its configured expiration condition.
Step Returns Collection
The following step properties contain return values when the task is completed or rejected (run time).
- stepReturn.routeTo – Includes the user's GUID reference
- stepReturn.completedByUsers – Includes the user's GUID reference
- stepReturn.rejectedUserList - Includes the user's GUID reference
Usage:
The Task step is the general-purpose human-interaction step in FlowWright.
It is appropriate whenever a workflow must pause for a person or group to perform an activity before continuing.
Typical uses include:
- Approvals
- Reviews
- Data verification
- Document reviews
- Customer-service activities
- Management decisions
- Quality checks
- Exception handling
- Operational work assignments
- Compliance reviews
- Escalations
- Multi-person reviews
The ability to route to users, roles, or email addresses makes the step suitable for both individual and group-oriented workflows.

When the workflow reaches the Task step, FlowWright creates a human task and routes it to the configured recipient (s). The workflow then proceeds according to the resulting task outcome.
Typical Workflow Suggestions:
Approval Workflow
The most common use of the Task step is to obtain approval from a user or role.
Example:
Submit Request → Task: Manager Approval → Process Approval → Complete
Configure the approval button label and, when appropriate, the rejection button to make the task interface clear to the reviewer.
Document Review
Use a Task to route a document to a reviewer.
Example:
Generate Document → Task: Review Document → Publish Document
The Item that is routed and Rendered, and the URL properties, can be used to associate the task with the relevant business item or page.
Multi-Person Approval
Use Wait for all to respond when every assigned participant must provide a response.
Example:
Submit Request → Task: Review by Finance & Legal → Continue
Enable "Wait for all to respond" so the workflow does not continue until all assigned users have responded.
Role-Based Assignment
Route a task to a role rather than an individual user.
Example:
Customer Request → Task: Service Review → Process Request
Select the appropriate role using Select roles to route to.
This allows responsibility to remain associated with a business function rather than a specific employee.
Quality Review
Use a Task to perform a manual quality-control activity.
Example:
Create Output → Task: Quality Review → Publish Output
Use Comment required when the reviewer needs to document observations or findings.
Exception Handling
Use a Task when automated processing encounters an exception requiring human intervention.
Example:
Automated Processing → Exception → Task: Resolve Exception → Resume Processing
The task can provide detailed instructions and a direct URL to the relevant information.
Time-Sensitive Approval
Configure task priority, duration, reminders, and expiration for activities that must be completed within a defined timeframe.
Example:
Submit Request → Task: Urgent Approval → Continue / Escalate
The Task step exposes priority, completion duration, expiration, and reminder properties for this scenario.
Escalation
Use task routing rules and reminders to escalate an activity if the initial recipient does not respond.
Example:
Create Task → Task Routing Rules → Reminder → Escalation
The XML exposes both Task Routing Rules and Task Reminders for configuring this type of behavior.
External Participant
Use Email addresses to route tasks to when task communication needs to include recipients represented by email addresses rather than only FlowWright users or roles.
Example:
Let’s build and execute the “taskDef” example.
- Create a new process definition named “taskDef” and open it in Designer mode.
- Drag the “Task and Placeholder" steps to the canvas.
- Connect the dots between the “Start” and “Task” steps.
- Select the line between the steps to configure the “Connection Properties”. The default property values are “None, Closed, Completed, Rejected, Error, Evaluate, and Timeout”. Depending on the step’s purpose, additional values are available for configuration.
- Click the “Task” step to configure its “Required” properties. Provide a step name and a task description. Note: The task step has one incoming and one outgoing connection. Click the Save button. Note: Click the "AI Predict" button to have the Copilot add new process steps that match your process description.

- Click the globe icon to globalize the task step using the following UI. Select the language from the dropdown list. Click the “Translate” button to convert the description into the selected language. A notification message is displayed in the top-right corner.

- Click the “Task” step to configure its “Optional” properties. Click the button to select the users to route to. Next, click the button to choose the application role (users) to route to. Provide a task description. Provide information about the routed items. Provide a URL to render (external links require internet access). Provide a semicolon-separated list of external email addresses.

- Continue configuring the “task” step's “Optional” properties, as shown below. Select the task priority from the list (low, medium, high, normal, urgent). Select the task expiration type (days, hours, months, minutes). Provide the task completion duration value. Select the 'Include weekends' option as 'Yes' if desired. The task shall continue the process path after the specified expiration; the connection link is configured as “timeout.”

- Select 'Yes' to have the task wait for the entire duration, even after completion.

-
Task Routing Rules - Select task routing rules (default, task lock, least # of tasks in total, least # of tasks by definition) to be applied during runtime.
- “Default” means the task has no lock status.
- “Task lock” means the task is locked by a user.
- “Least # of tasks in Total” means the task is assigned to the user with the fewest total tasks.
- “Least # of tasks by Definition” means the task is assigned to the user with the least count of tasks by definition.

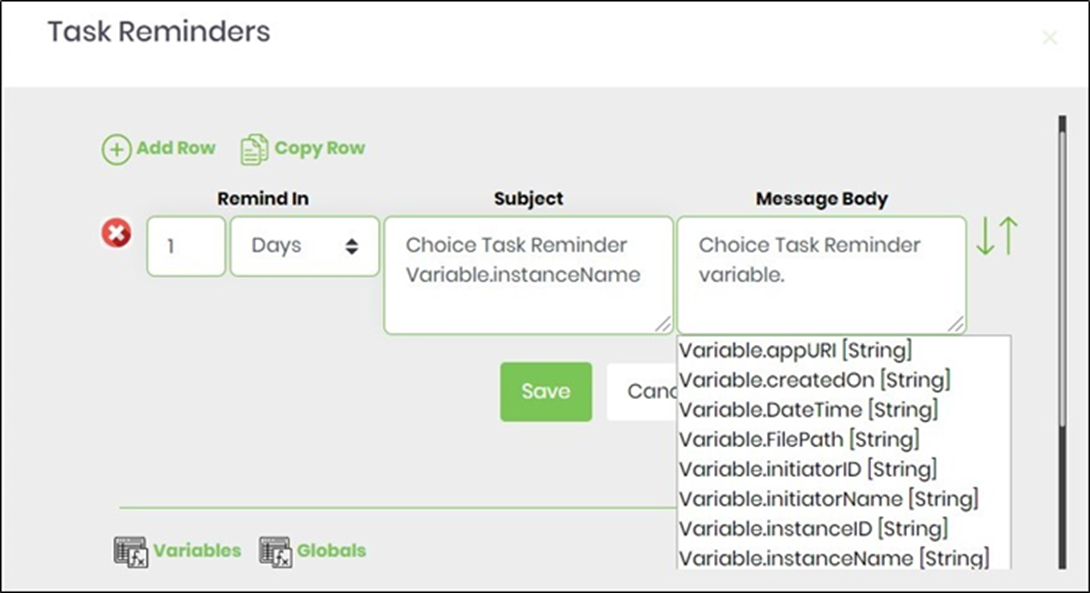
- Configure task reminders. Click the Add Row (+) button to insert an empty row. Provided the time duration, subject, and message body information. Click the Save button. You can insert multiple Task Reminders using the Add Row function.

- Configure whether the task needs to wait until all users have responded (when routed to more than one user). Provide a variable or global reference to store the list of routed users upon task completion. The variable may be created before or after the process definition is saved. Select “Yes” to send an email notification (the Status determines the notification duration - Status - Settings - Email - Notifications section). Select “Yes” if separate emails are to be sent to users (separate task ID URLs). Provide the FROM email address (other than the default). Provide the email subject text. Click the button to configure email attachments on the app server.

- Click the button to enter the email body. Click the button to configure email attachments from the app server path. Provide an Email CC list (semicolon-separated). Select “Yes” to send expired notifications (the Status determines the notification duration - Status - Settings - Email - Expired Task Notifications section). Select “Yes” to email an acknowledgment link. Provide new text to change the Approve and Reject button labels (e.g., OK and Not OK). Select “Yes” to hide the Reject button. Select “Yes” to reassign the task at runtime. Select “Yes” for mandatory task comments.

- Search for users by the first three characters and select from the list in the left pane using the arrow buttons. The task can be assigned to multiple users.
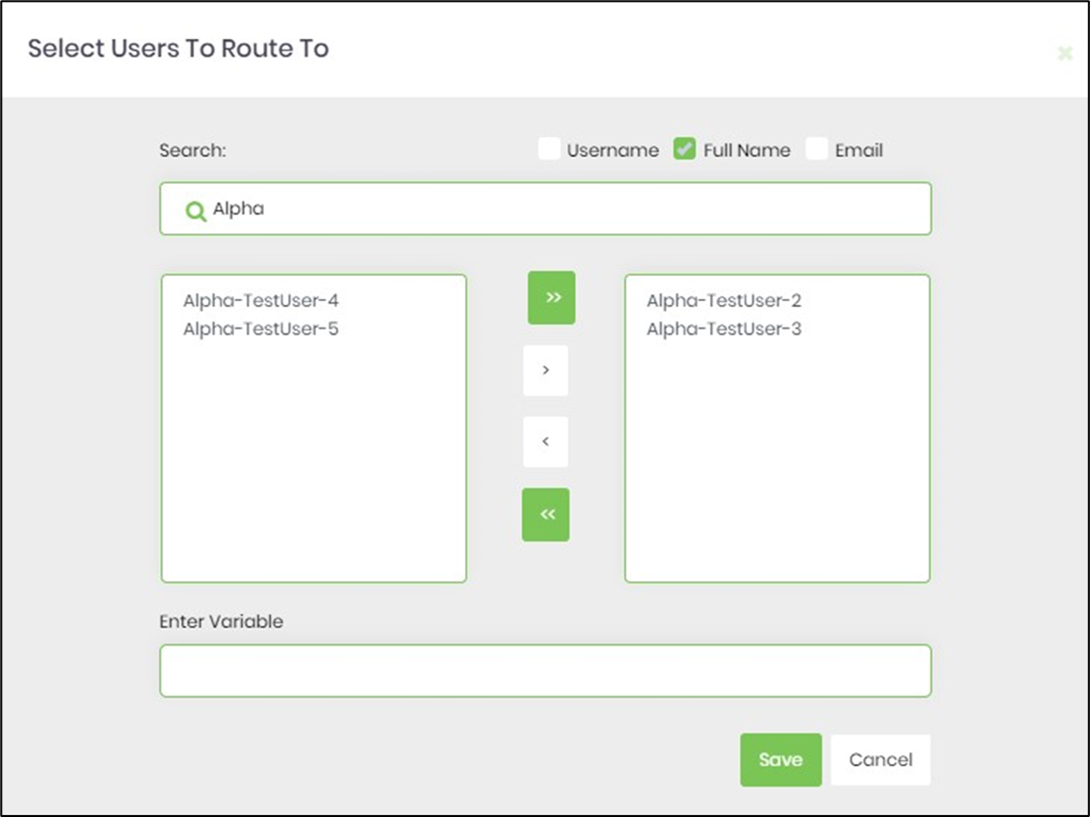
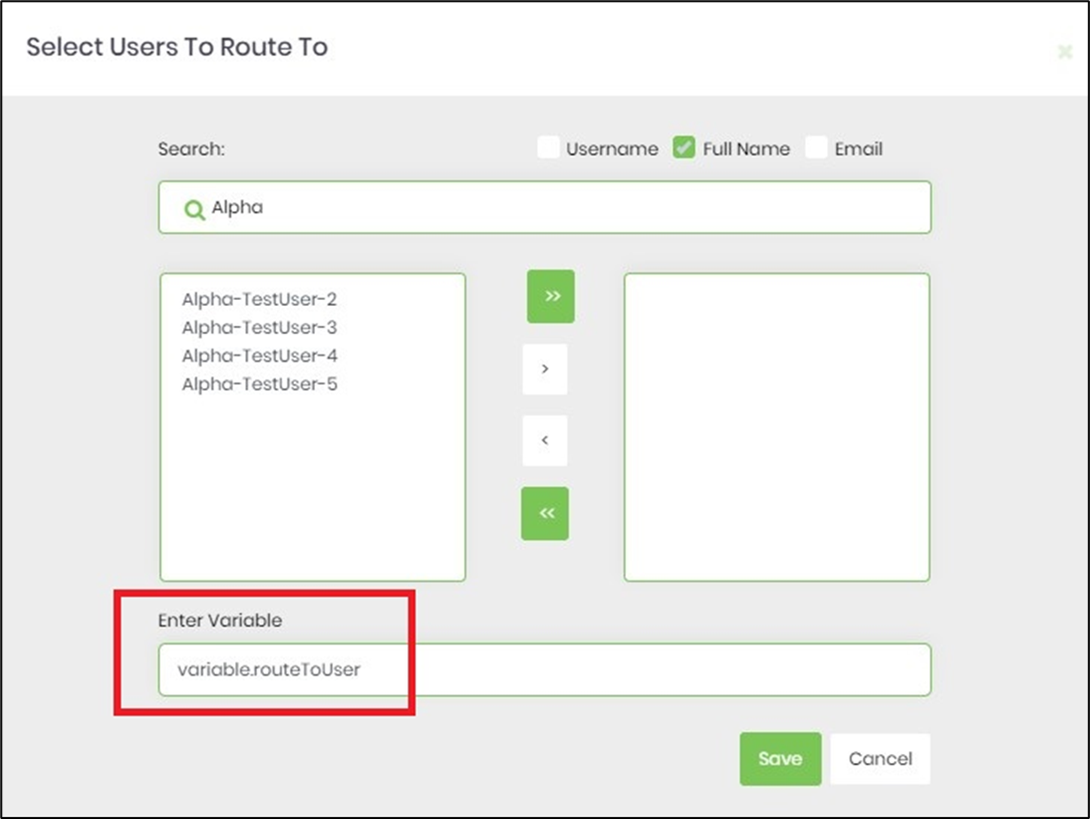
- The Task can also be assigned to a user by GUID (provided we know the value beforehand). Configure the variable to reference the user's GUID. The username selection should be empty, as the function is mutually exclusive, as shown in the image below. Note: When routing a task or form to the queue, the system recalculates the task expiration date upon assignment to a user.
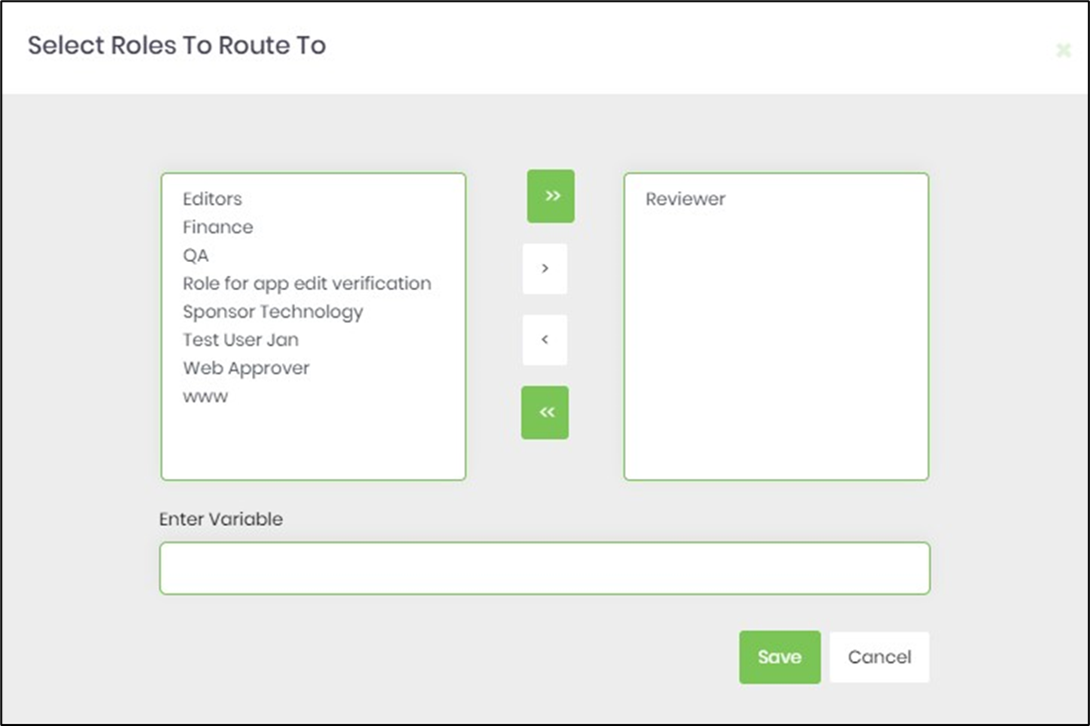
- The Task can also be assigned to users grouped by application role. Use the arrow buttons to select from the list in the left pane.
- Click the Task Reminder to set the task reminder interval. Enable "Send Email Notification" to “On”. Task reminders with a positive value are calculated from the task creation date. Task reminders with a negative value are calculated by subtracting that duration from the task's due date. The task reminder message body supports line breaks.
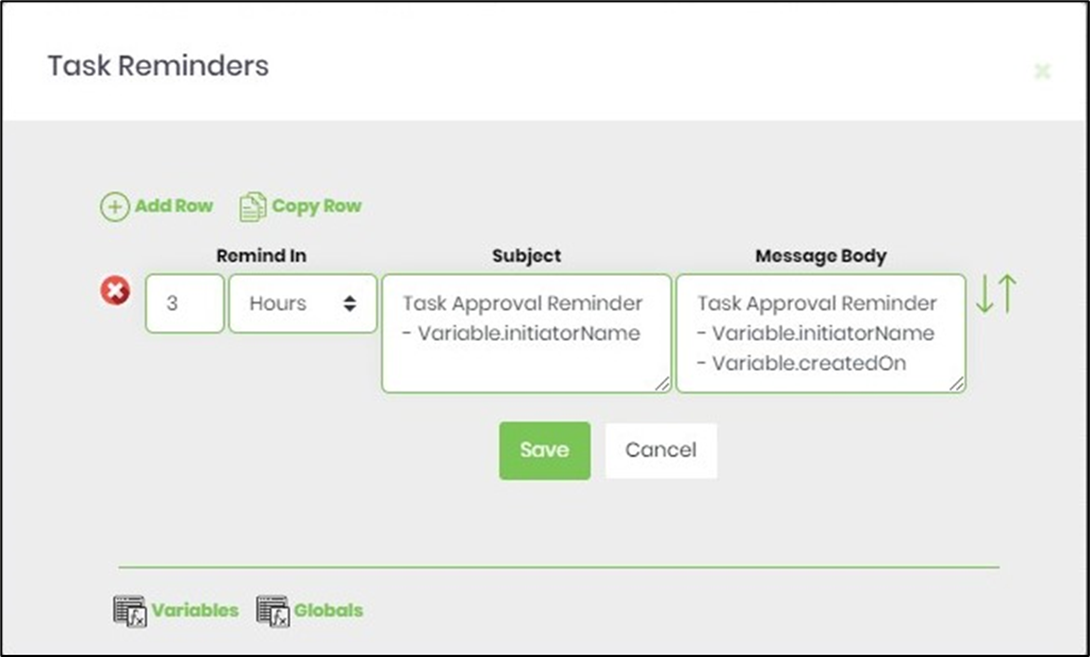
- Task reminders configured with a negative value are calculated by subtracting that duration from the task's due date.
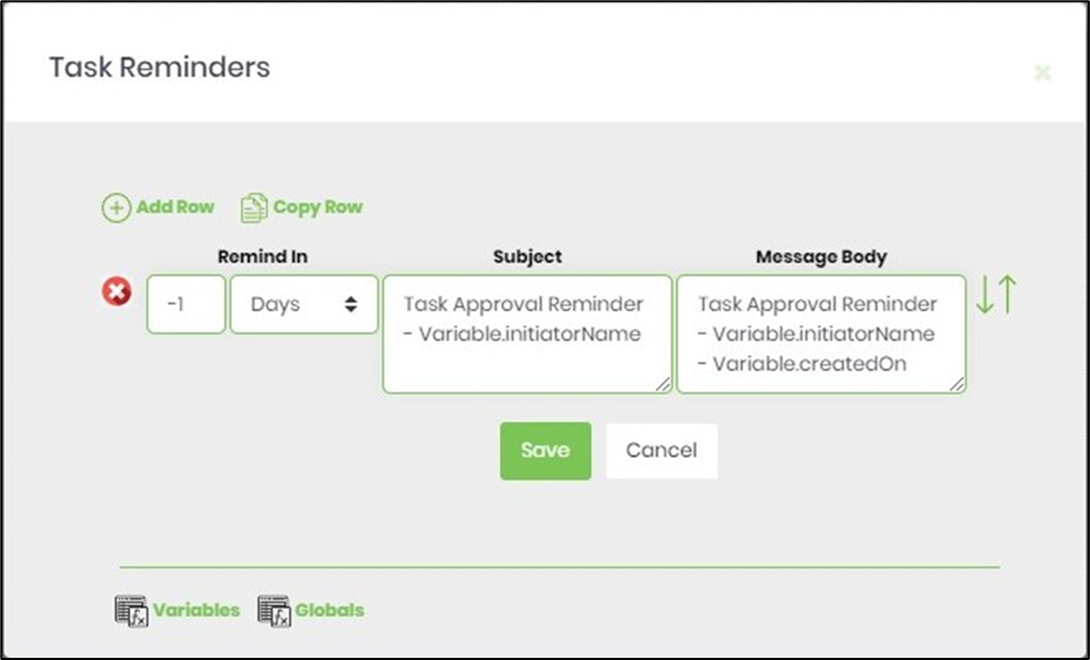
- Use variable references for more meaningful reminder messages, as shown below.
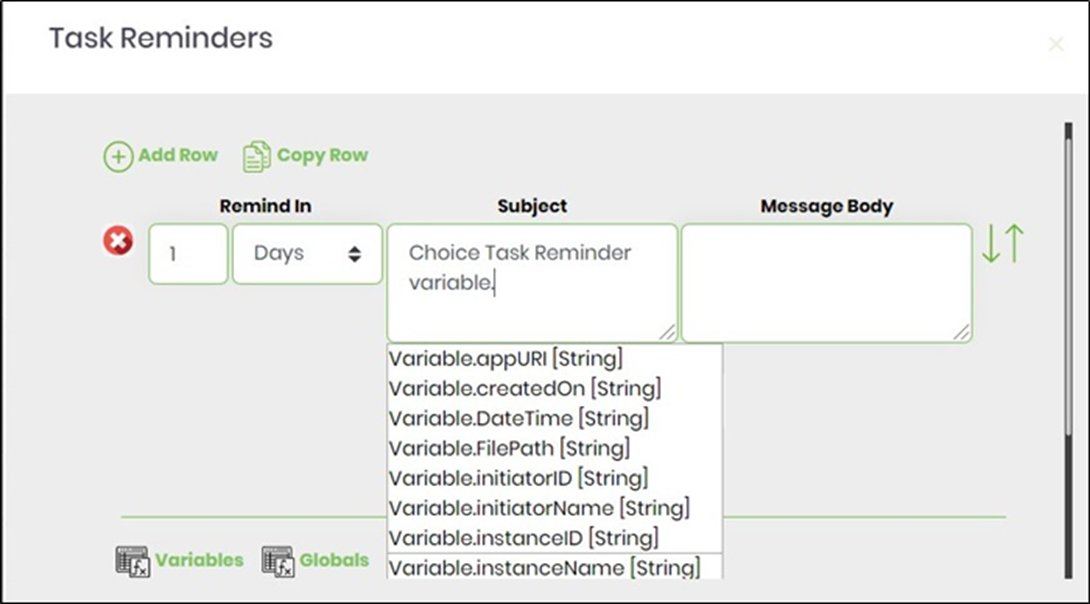
- Use variable references for more meaningful reminder messages, as shown below.
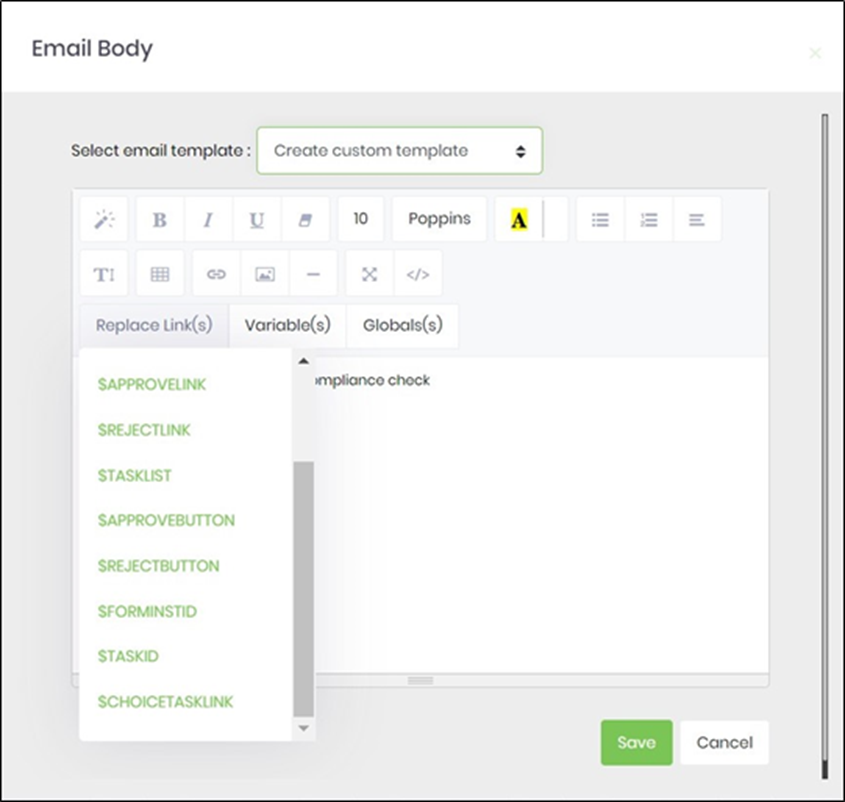
- Click the Email body and use the existing template (you can also edit it), or create a custom one. Learn how to use Replace Links in the body of the task email.
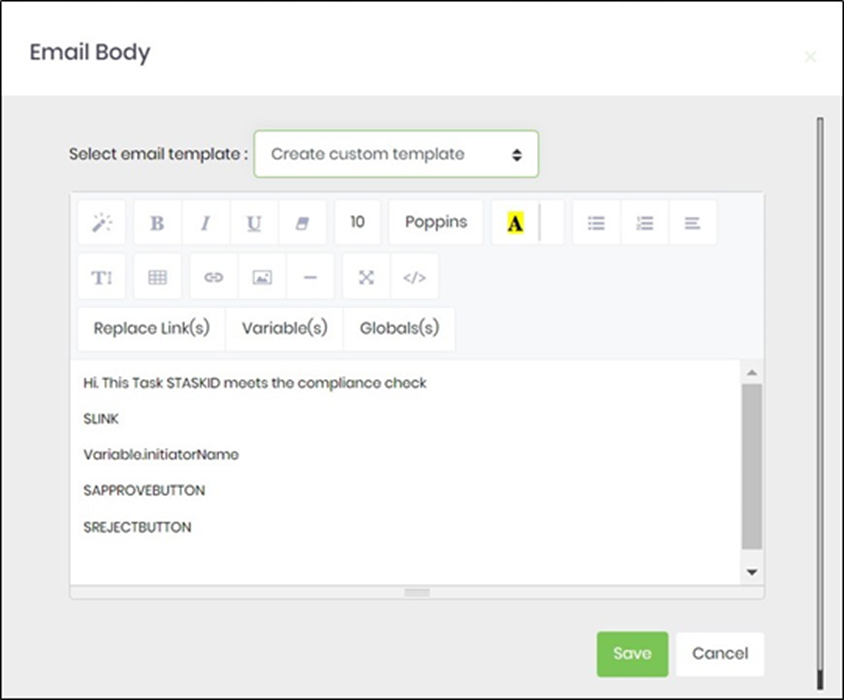
- Click the Replace Link(s) or Variable(s) or Global(s) and select any reference to add a more meaningful email message.
- The “Logging” setting is necessary for documentation and for tracking workflow progress and percent completion. This is done by configuring the step state and percent fields individually, as shown in the images below. Configure the “Logging” using the following properties. The "Send Test Mail" feature sends a test email with the configured email body to the current (logged-in) user.

- Save the process definition, create a new instance, and execute it. Render the process instance.

- Click “Items > Tasks”. The step should route the task to users. Note: When routing a Task or Form to the queue, the system recalculates the task's expiration date upon assignment to a user.

- The task to the user is rendered as shown below. The user can attach files to the task, select the return value, and provide comments. The choice task can be saved incrementally using the “percentage scroll bar” and the “Save Comment” button. Note: The files attached to the task are stored in the application server's file system or in the DMS file storage folder, whose configuration is defined in the “Start” process step. The user clicks the “Approve or Reject” button to complete the task, and the process instance advances to the next step in the workflow.

Tips:
- Give the task a clear, action-oriented Task description.
- Use Task detail description to provide sufficient information for the recipient to complete the activity without unnecessary ambiguity.
- Prefer role-based routing when responsibility belongs to a department or business function rather than a particular person.
- Use Wait for all to respond only when every assigned participant must respond.
- Configure Task Routing Rules when assignment needs to follow business rules rather than static routing.
- Configure Task Reminders for activities where delayed responses could affect process performance.
- Set an appropriate Task priority for important or time-sensitive work.
- Configure the "Complete the task in" and "Task expire type" when the task has a meaningful deadline.
- Use Comment required when a decision or action needs an explanation for audit purposes.
- Customize the approval and rejection labels when standard Approve and Reject terminology does not accurately describe the business action.
- Use Hide reject button? when rejection is not an applicable outcome.
- Enable User can reassign a task when responsibility legitimately needs to be transferred.
- Use Send Email notification when recipients should receive an email in addition to the task appearing in FlowWright.
- Use Email file attachments when recipients need supporting workflow documents.
- Store the routed user list in a Variable/Global property so later workflow steps know who was assigned.
- Test all four return paths—closed, completed, rejected, and timeout—when designing the downstream workflow logic.
Notes:
The Task step is defined in the Human Tasks category with the internal name task, display name Task, and description “Routes a task to a selected number of users.”
The step is implemented by FlowWright.Workflow.RouteDocStep in FlowWright.Workflow.dll. It is a Process step with 2 incoming connections and 2 outgoing connections.
The XML defines 30 configurable properties. Of these, Task description is required; all other properties are optional.
The step uses FlowWright data types for user selection, role selection, priority, expiration, routing rules, reminders, rich-text email composition, file lists, and Yes/No configuration.
The Task step provides four return paths: closed, completed, rejected, and timeout.
Feature comparison.
| Feature | Task | CheckListTask | ChoiceTask | RouteToQueue | UserSelectionTask |
|---|---|---|---|---|---|
| Primary purpose | Route a task to users/roles | Route a task containing checklist items | Route a task where users select a defined choice | Route a task to a queue | Route a task using configurable user selection |
| Category | Human Tasks | Human Tasks | Human Tasks | Human Tasks | Human Tasks |
| Select users | Yes | Yes | Yes | No | Yes |
| Select roles | Yes | Yes | Yes | No | Yes |
| Select queue | No | No | No | Yes | No |
| Checklist | No | Yes | No | No | No |
| User-selection configuration | No | No | No | No | Yes |
| Choice/return-value configuration | No | No | Yes | No | No |
| Routed item | Yes | Yes | Yes | Yes | No |
| Render URL | Yes | Yes | Yes | Yes | No |
| External email addresses | Yes | Yes | Yes | No | No |
| Task priority | Yes | Yes | Yes | Yes | Yes |
| Queue priority | No | No | No | Yes | No |
| Due duration | Yes | Yes | Yes | Yes | Yes |
| Expiration type | Yes | Yes | Yes | Yes | Yes |
| Include weekends | Yes | Yes | Yes | Yes | Yes |
| Use full duration | Yes | Yes | Yes | No | Yes |
| Routing rules | Yes | Yes | Yes | No | Yes |
| Task reminders | Yes | Yes | Yes | No | Yes |
| Wait for all to respond | Yes | Yes | No | No | Yes |
| Store routed users | Yes | Yes | No | No | Yes |
| Email notification | Yes | Yes | Yes | No | Yes |
| Separate emails | Yes | Yes | Yes | No | Yes |
| Email subject/body | Yes | Yes | Yes | No | Yes |
| Email attachments | Yes | Yes | Yes | No | Yes |
| CC list | Yes | Yes | Yes | No | Yes |
| Expired-task email | Yes | Yes | No | No | Yes |
| Acknowledgement link | Yes | Yes | No | No | Yes |
| Approval/reject button labels | Yes | Yes | No | No | Yes |
| Hide reject button | Yes | Yes | No | No | Yes |
| Reassign task | Yes | Yes | Yes | No | Yes |
| Require comment | Yes | Yes | Yes | No | Yes |
| Store selections | No | Yes | No | No | No |
| Return paths | closed, completed, rejected, timeout | closed, completed, rejected, timeout | Defined through choice return values | completed, rejected, timeout | closed, completed, rejected, timeout |
Definition Sample:
You may download a sample definition when provided and import it into your FlowWright Process Definition.
Note: Verify and complete any missing configuration after importing a sample, including:
- Users or roles
- Task description
- Task instructions
- Routed item
- URL
- Priority
- Completion duration
- Expiration settings
- Routing rules
- Reminders
- Email notification settings
- Approval/rejection configuration
- Reassignment settings
- Comment requirements
- Outgoing connections
After verifying the configuration, save the Process Definition before execution.