1 Welcome
This is FlowWright’s OAuth guide. It explains how to set up and use FlowWright’s OAuth system.
1.0 What is OAuth?
OAuth is an open standard for access delegation, typically used by Internet users to grant websites or applications access to information without sharing passwords.
1.1 How does OAuth work?
The diagram below illustrates the OAuth process.
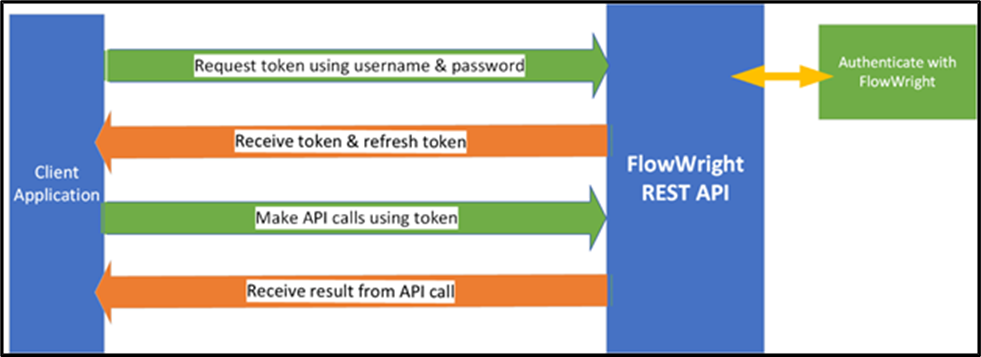
- A client application authenticates with the FlowWright REST API using a username and password.
- If authentication succeeds, FlowWright issues a token and a refresh token.
- Calls to the FlowWright REST API can be made using the token.
- FlowWright’s REST API authenticates the token, executes the API call, and provides a response.
2 OAuth Tokens
2.1 How to Get a Token.
The first step is to authenticate and obtain a token from the REST API. Throughout this documentation, we will use POSTMAN to demonstrate this process. You can use any other familiar tool if you prefer. If you don’t have POSTMAN, you can download it for free from the following link: https://www.postman.com/
Let’s begin! You need to send a POST request with user authentication details to obtain a token.
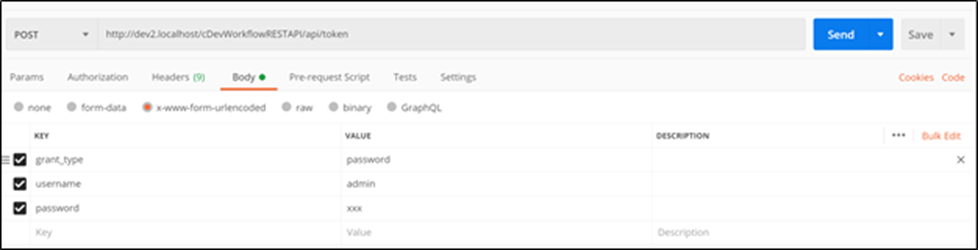
As shown in the diagram above, an HTTP POST request is sent to the REST API URL:
http://localhost:8080/api/token
Within the request body, three form elements are passed with their respective values.
- username – FlowWright username
- password – FlowWright user password
- grant_type – password
The Form body should be sent as “x-www-form-urlencoded,” then, after the request is sent, the REST API will authenticate against FlowWright security. If authentication fails for any reason, you will see a response similar to the one shown below.

If the authentication is successful, you will see a request with the information displayed below.

The response returned is in JSON format, and it includes the following information:
- access_token – a token used for making REST API calls
- token_type – bearer type token
- expires_in – expiration in seconds
- refresh_token – refresh token for requesting tokens in the future
- refreshTokenExpire – expiration date/time of refresh token in UTC
- .issued – issued date/time of token in UTC
- .expires – expiration date/time of token in UTC
Once received, a token can be used to make any REST API calls during its validity period. In the above request, the token is valid for 599 seconds or 10 minutes, and the refresh token remains valid for 1 month.
2.2 Making the REST API Call using the Token.
Now that we have authenticated and obtained an OAuth token, we can use it to make a REST API call. We will retrieve the list of users using the REST API call “getUsers.” Below is the request configuration within the POSTMAN application.
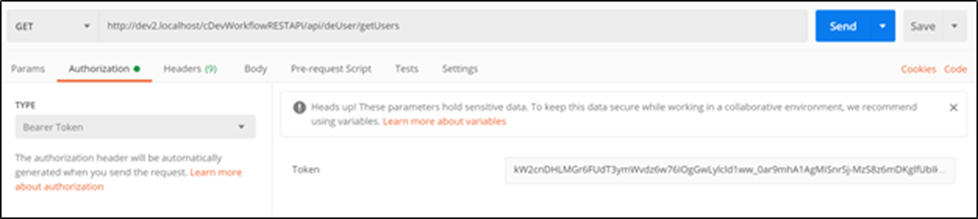
As shown above, the HTTP method is set to GET, and the REST API call URL is configured as follows:
http://localhost:8080/api/User/GetUser
Under the “Authorization” section, select “Bearer Token” as the authentication type and enter the token received from the previous call. Click the “Send” button to send the request to the server. FlowWright authentication will validate the token and, if successful, process the “getUsers” API call and return the response from the call.

As shown above, the REST API successfully authenticated using the token and returned the response. The “getUsers” call provided a list of users in JSON format.
On the other hand, if the token were invalid, you would receive the following message:

And if an expired token is sent, you will see the following message:

2.3 Requesting a New Token using the Refresh Token.
If a token expires, you can request a new one using the “refresh token" feature. The process for requesting a refreshed token is similar to the one you have already seen when requesting a new token. Below is the process for requesting a refreshed token:

As before, continue to use the same token-requesting URL:
http://localhost:8080/api/token

The diagram above shows that an HTTP POST request is sent to obtain a new token. The form body contains the following fields and their configured values:
- grant_type – set the grant type to “refresh_token”
- refresh_token – pass the refreshed token received from the first token call
If the request for a refreshed token succeeds, the following response will be returned:

The JSON response received contains a new OAuth token with an updated expiration date and time. The response payload is in the same format as the token request. A successful response is only returned if the refreshed token is valid and not expired.
The new access token can now be used to make REST API calls. If the “refresh token” request is invalid or expired, you will see the following response message:

Note: When requesting a new token, if the refreshed token is valid, the same refreshed token will be returned again.
3. Configurations.
The token request calls the OAuth API and returns a JSON response. This JSON contains two tokens and their expiration times in UTC date/time format. The default expiration values for both tokens are as follows:
- token – 10 minutes or 600 seconds
- refresh token – 1 month
These are configuration values found in the REST API’s application settings file. Navigate to the following REST API directory:
C:\FlowWright
Open the file “appSettings.json" to see the following app settings keys and values:

Use the key “TokenExpireMinutes” to set your own standard number of minutes for the token to expire. Use the key “RefershTokenExpireDays” to set your own standard number of days to expire the refresh token. Once the above key values are changed, you will see that token expirations have also changed.
4. Integrations
Now that you can request OAuth tokens through the REST API, you can use them to make API calls. Importantly, these tokens can also enhance your ability to utilise FlowWright's capabilities effectively.
4.1 Using Tokens for User Interface Authentication
The FlowWright configuration manager user interface (UI) can be set up with various authentication methods, beginning with v9.7 and OAuth token authentication. Pass the token via the URL to the login page to complete this process.
http://localhost:8080/Login?apitoken=XXXXXXXXXXXXXXXX
Replace the “XXXXXXXXXXXXXX” with your OAuth token's name. The FlowWright Configuration Manager UI will validate the token, authenticate the user if successful, and then open the application UI.
For example, if you want to automatically log in to the UI and display the “List of Tasks” page, you can use the following URL:
http://localhost:8080/Login?ReturnUrl=ConfigTasks.aspx&apitoken=XXXXXXXXXXXXXXX
If you want to open the Workflow designer to a specific workflow definition and then display it, you can use the following URL format:
If you want to open the Forms Designer for a specific form definition and display it, you can use the following URL format:
Furthermore, to render a Form instance, you can use the following URL format:
4.2 Using Tokens for Microservice Authentication.
FlowWright microservices can be configured with or without authentication. If authentication is enabled, each microservice call will require it. Microservices support two types of authentication:
1) Basic authentication and 2) Token authentication.
Here is an example URL for a FlowWright microservice:
http://localhost:8080/MicroServices/AddTwoNumbers?value1=34
Below is the request configuration shown on POSTMAN:

As shown, an HTTP POST request is sent to the URL along with the authentication information: the authentication type is set to “Bearer Token,” and the token value is set to a valid OAuth token.
Then, after the request is sent to the microservice, the FlowWright microservice responds as shown:
