Applications (AppBuilder) simplify using FlowWright software by letting you select the necessary features (such as Dashboards, Initiate Forms, Task List, Process View, and Reports) as a custom application, configure a separate UI with authentication, and grant access to this custom application for user application groups.
The Administrator can publish the custom application to FlowWright's App Store.
The Applications feature consists of two parts.
- Design
- Runtime
Using the Design feature, we can;
- Define an application around FlowWright features like Dashboards, Initiate Forms, Task List, Process View, and Reports
- Create a login page and customize it
- Configure the application's authentication connection
- Configure the application's languages to render
- Application Globalization
- Grant access to specific application roles
- Create application UI layout with menus and submenus
- Control the display of menus and submenus as per the user's application role
Using the Runtime feature, we can;
- Render the login screen, menus, submenus, and application as per the user's application role
- Use the application
- Engage with a responsive UI that auto-adjusts for any device or screen
How to build an Application?
Building a new application takes three steps.
- Create an Application
- Configure the login page with a name, description, and logos
- Configure the application for user access, application logo, menus, submenus, menu items like the dashboard, forms, tasks, processes, user area, and display area
As a FlowWright Admin, navigate to the “Applications > Manage Applications”. The application builder page opens in a new tab, as shown in the image below. By default, the table displays local applications in a format similar to the one below. Use the AppLink to navigate to the local application on the new page.

Click the “App Store” button to switch to and view installed apps available from the App Store, as shown below. Use the AppLink to navigate the App Store application to a new page.

To create a local application, click “Actions > Create”. A pop-up window with configuration fields will appear. Provide the Application Name and Key. Select user application roles from the dropdown list that can access this application. After creating the application, use the checkbox to open the Designer. The sample input is shown below. Click the “Create” button to proceed.

AppBuilder renders the template on the new page, as shown below. This page has two sections to be configured: the “Login Page and the Application”. A navigation key is provided in the top-right corner for navigation when the configuration is ready.
Provide the Login App Name, Description, and Button text, as below.

How to configure the Login Page?
The Login Page Configuration UI manages the login name, app description, button text, login logo, and background image displayed during the application login.
Provide the login app name and description. Enter the button text (for example, "Sign In"). Click the “Choose File” button to upload the login logo and the background image. Click the “Preview” button to view the selected image. Click the “Save” button to confirm the changes. Note: The application log and the login logo are the same until changed.

Click the AppLink icon to preview the application Login page.

The page is rendered as shown below. Note: If “Form Authentication” is the only authentication, it redirects to the login page.

How to use the Application Configuration?
The Application Configuration UI manages the application logo, menu items, user area, and display area information needed for rendering at runtime.
Select the authorization roles from the dropdown list as shown below.

The application logo and the login logo are the same (if available), or the default FlowWright logo is displayed. Click the modify icon to change this image. A configuration pop-up window appears. Choose an image file from the local folder and confirm the upload. The sample input is shown in the image below.

The new logo is rendered, and a confirmation message appears in the top-right corner.

Click the user profile icon to configure the Display Area.

A pop-up window opens for configuration. Select the checkboxes to include information, then click “Save” to confirm the changes. The sample input is shown below.

Click the “Add Menu Item” button to create a menu item. A configuration pop-up appears, as shown below. Enter the menu name. Select an action from the dropdown list: “Dashboard, Form, Process, Report, Tasks, Custom Action, Other Menu, and No Action”. Select the relevant existing items from the list. For example, select an existing dashboard. Select the authorization roles from the list. Select the checkbox to open the page in a new tab. Click the “Choose File” button to upload an image icon for the menu. Click "Save" to confirm the changes. The sample input is shown below.

Note: The action menu item can be associated with an existing Dashboard, Form, Process, Report, Task from a process, Custom Action (a hyperlink to another page), Other Menu (cross-connect to another menu item), or No Action (do nothing).

Configure multiple user authorization roles for this dashboard from the drop-down list.

In this example, the Menu configuration uses a Form, and the UI lets you select either “Public” or “Private” forms, specifically “Forms With URL” or “All Forms”.

The menu item is created successfully. Hover over the new menu item, then click “Add Submenus”, as shown in the image below. The create submenu action is similar to what was described above.

Click the “Configure Default Page” button in the Display Area. A configuration pop-up window will appear, as shown below.

Select one or more authorization roles from the dropdown list.

Select the menu item from the list and click the plus (+) sign to include it. The sample input is shown below.

The default page is now configured for authorized users, with this menu. Click the “remove icon” to undo the changes.

Click the Save button. A confirmation message is displayed in the top-right corner.

Use the 'Add Menu Item' feature to add more menu items related to “Dashboard, Form, Process, Report, Tasks, Custom Action, Other Menu, and No Action”. The items considered for the display area are listed below. Up to 3 levels of sub-menus are allowed.

How to execute the application?
On the Application page, Admin users can click the navigation icon to execute the application.

On the Manage Applications page, authorized users can click the navigation icon “Open Application” to execute an application.

Also, after logging in to the FlowWright application, copy and paste the following URL to view the application page.
https://<your server>/Apps
The My Applications page renders a list of authorized applications arranged in a deck, as shown below. The user clicks the "Open" link on the app icon to launch the application.

The user authenticates on the application's login screen, as configured.
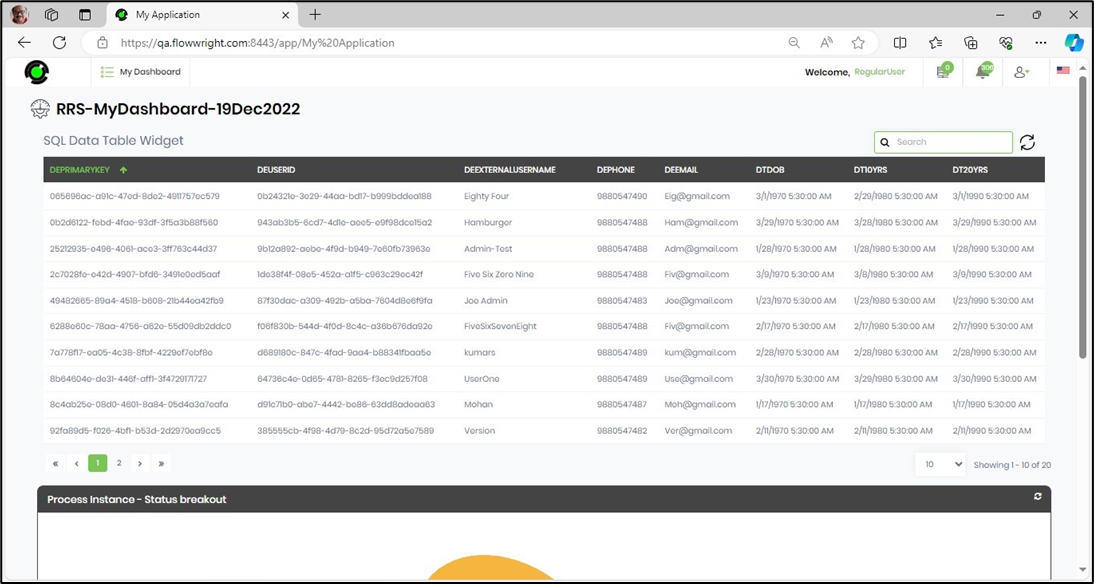
The application displays the default page on load, as shown below. The user can navigate to other features using the menu items. Click the “User Profile > Apps” menu option to access the My Applications page. Click the “User Profile > Logout” menu option to exit the application. Note: The application does not render the FlowWright left menu and user area for “regular users” (without admin privileges).
How do you modify an application's metadata, such as name and application key?
As a FlowWright Admin, navigate to the “Create > Application” page and select the application from the table list. Then, choose “Actions > Edit”.

The Application metadata is rendered in the pop-up window. Modify the application name, application key, and user access based on the user's application role. Unmark the “Active” checkbox to disable the application. Click the “Update” button to save the new configuration.

The application changes have been applied, and a confirmation message appears in the top-right corner.

How to modify an application configuration?
As a FlowWright Admin, navigate to the “Create > Application” page and select the application from the table list. Then, choose “Actions > Design”.

The Application configuration is rendered on the new page. Here, you can modify the login page and application configurations. Click the “Update” button to save the new configuration. An alert notification confirms the changes.

The configuration changes are tracked and viewed in “Status > Logs > System Log > Audit Log”.

How to configure authentication for an application?
Navigate to “Create > Application” and select the application from the table list. Click “Actions > Design”.

The application configuration is displayed on the new page. Select the “Actions” menu option to navigate to the “Authentication, Languages, Globalization, and Themes” features.

A pop-up window is displayed for configuration, as shown in the image below. Click the drop-down to view the list.

To configure, select the authentication connections from the drop-down list. These connections are available from “Integrations > Connections”.
Configure multiple authentication connections and click the “Save” button.
The application authentication is configured, and a confirmation message appears in the top-right corner.

How to configure languages for an application?
Navigate to “Create > Application” and select the application from the table list. Click “Actions > Design”.

The application configuration is displayed on the new page. Select “Actions > Languages".

The Configure Languages pop-up appears, showing the previously configured languages.

Click to add more to the list or remove.

Click the “Save” button.

The languages are configured for the App, and a confirmation message appears in the top-right corner.

How to globalize an application?
Navigate to “Create > Application” and select the application from the table list. Click “Actions > Design”.
The application configuration is displayed on the new page. Select “Actions > Globalize”.

The Globalize Application pop-up is shown. Select the language from the dropdown list and click the “Translate” button.

The text is translated using Google Translate or Azure Translate AI and placed in the adjacent text box. A confirmation message appears in the top-right corner.

Navigate to the My Applications page, then click the Open link to launch the application. The application login appears on a new page. Click the culture flag icon, then select the language region.

The application's login screen changes accordingly, as shown in the image below. Log in to the application.

How to configure a UI Theme?
Navigate to “Create > Application” and select the application from the table list. Click “Actions > Design”.
The application configuration appears on the new page. Select “Actions > Themes”.

A pop-up window is displayed for configuration. Click the drop-down to view the list. The UI Themes are created and managed in the “Administration > UI Themes” page.

Select a UI Theme from the list, then click the “Preview” button. Click the “Apply” button to confirm the changes.

The application is rendered for preview on a new page, as shown below.

View - User Statistics
Select the application from the table, then click “View > User Statistics”.

The application's user statistics are shown below.

View - Dependency Tree
Select the application from the table, then click “View > Dependency Tree”.

The dependency tree view appears on the same page, as shown below. Click a branch to expand or collapse the view.

View - History
Select the application from the table, then click “View > History”.

The image below shows the application history information.

The image below shows the application permission information.

Export Menu.
Select the application from the table, then click “Export” to access the “XML, SQL, and Package” features. Select any option from the menu to generate and download the file to the local folder.

The XML file format is provided here for reference.

The SQL file format is provided here for reference.

The Package XML file format is provided here for reference.

Import Menu.
Select the application from the table, then click “Import” to access the “XML” feature.

Select the XML file from the local folder and click the “Update Application XML” button.

The application configuration is updated, and a confirmation message appears in the top-right corner.
