Create a new process instance
A new process instance can be created from a process definition by clicking the “Actions -> Create” menu item.

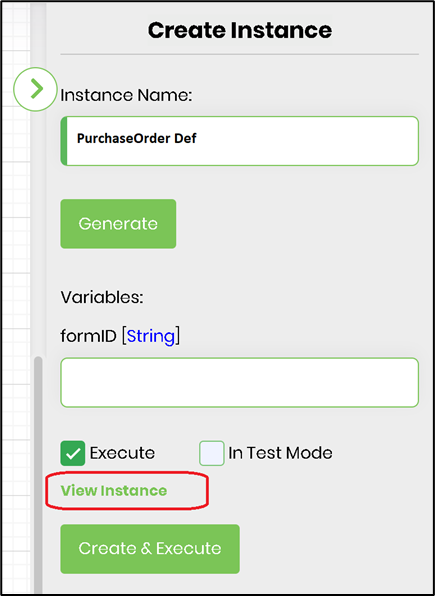
The following “Create Instance” dialog is displayed:

Generate instance name
The generate functionality generates a name for the new instance based on the definition name and the next incremented index for the selected definition from the pull-down menu as shown below:

Select a process definition from the pull-down menu list and click the “Generate” button to create the new instance name. Click the “Create & Execute” button, the newly generated instance is created. Once the instance is created, the workflow instance will have a status of “executing”. The instance can be rendered directly by clicking on "View Instance" link, as shown here. All date/times are stored within the database as UTC and displayed based on local timezone of the user.
Note: Engine runtime data are in ISO + UTC format.

Test mode
Test mode lets you test a workflow process, the workflow could be routing tasks, forms, or even sending emails to different users. But, when executed with “Test Mode”, configured users for tasks, forms and emails are ignored and automatically sent to the executing user.

Running the engine manually
By clicking the “Run Engine” menu item, the workflow engine can be executed manually. This will execute the next item to be processed from the workflow request queue.

Refresh process instance list
By clicking the “icon” shown, the information displayed on the workflow instance list table is refreshed.

Reset process instance
A started workflow can be reset back to its original design by selecting a process instance from the list and by clicking the “Actions -> Reset -> Selected” button. This is useful, after executing an instance if the design of the process changes. A new instance based on the definition does not have to be created to re-test the definition.


A started workflow can be reset back to a selected workflow step by selecting a process instance from the list and by clicking the “Actions -> Reset -> To Step” button. Select the desired step from the popup window and confirm.

